Blogger Releases the new version of the Label Widget

Blogger,as a part of its 10th Birthday celebrations, has now released a new version of the label gadget.This one is much better that the old version

What is new?

  1. It comes with a Label Cloud.
  2. It lets you choose which labels are to be displayed.
  3. You can customize it further using CSS.

Drawbacks

  1. The cloud just has 5 variations.All labels will be divided into 5 classes depending on the usage of these labels.
  2. It would have been better if there was a bigger number of classes.

How to Customize?

You can customize the looks further by using CSS..As i said it has 5 classes of clouds..You can add CSS styles to each of them.

Here is a sample Style which will give a bluish look for the cloud..Here i have applied styles for all 5 label classes and their hover styles (so 10 style definitions in total).

.label-size-5 a {color: #2789ce; /*color of a label of class 5*/
font-size: 3em;
text-decoration: none;
}
.label-size-5 a:hover {color: #2789ce; /*color of a label of class 5 on hover*/
text-decoration: underline;
}
.label-size-4 a {color: #2789ce;/*color of a label of class 4*/
font-size: 2.5em;
text-decoration: none;
}
.label-size-4 a:hover {color: #2789ce;/*color of a label of class 4 on hover*/
text-decoration: underline;
}
.label-size-3 a {color: #2789ce;/*color of a label of class 3*/
font-size: 2em;
text-decoration: none;
}
.label-size-3 a:hover {color: #2789ce; /*color of a label of class 3 on hover*/
text-decoration: underline;
}
.label-size-2 a {color: #2789ce;/*color of a label of class 2*/
font-size: 1.5em;
text-decoration: none;
}
.label-size-2 a:hover {color: #2789ce; /*color of a label of class 2 on hover*/
text-decoration: underline;
}
.label-size-1 a {color: #2789ce;/*color of a label of class 1*/
font-size: 1em;
text-decoration: none;
}
.label-size-1 a:hover {color: #2789ce; /*color of a label of class 1 on hover*/
text-decoration: underline;
}


Here all of these CSS styles are customizable.You can change the colours and font sizes of each of the 5 classes.


color: #2789ce; is responsible for the colouring of each of the classes.You can change it appropriately with some other hex colour code or something like color:red;


You can adjust the font size of these 5 classes by adjusting the corresponding font-size: attribute of that label size class.. (em is a unit of font size just like px)


I have commented the css codes(10 comments)..You can remove those comments if you want(eg: /*color of a label of class 2 on hover*/ is a comment)


These CSS style definitions should be placed above

]]></b:skin>


If you are not impressed by the customizability of this blogger label cloud,try this advanced version of the cloud which is highly customizable Label Cloud Widget For Blogger


Source: http://www.bloggerplugins.org/2009/08/blogger-releases-new-version-of-label.html

New Advanced Post Editor For Blogger

Blogger has released an updated version of the Post Editor.This one has more features than the old post editor.Here is a screen shot of the new Post Editor,so that you can get an overview of what is new in this advanced post editor.

Some of the added Features in this new Editor are:

  1. Improved Image Handling
  2. Improved Raw HTML
  3. Geotagging
  4. Resize the Post Editor Vertically
  5. Easy Link Editing in Compose Mode
  6. Better Previews
  7. Draggable Placeholders
  8. A New Advanced ToolBar

How to Enable the New Post Editor

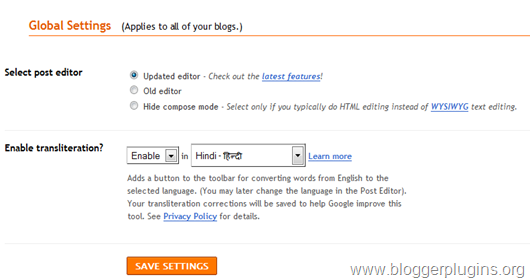
Go to the Settings Page, and under the global Settings, Opt for the Updated Editor and save the settings.


enable t
he new blogger post editor
Further Reading: Blogger Help Center
Source: http://www.bloggerplugins.org/2009/09/new-advanced-post-editor-for-blogger.html

The Best Blogger Resources

There are many many sites about blogger. Here i would like to share with you all blogger related sites which i love. All of these are my personal favourites.So i thought of sharing them with you guys! All of these sites provide tutorials,gadgets and templates which can be used on Blogger.


Blogger Tutorials and Gadgets


Amanda Fazani

She writes at Blogger Buster and Gadgets For Blogger . Blogger Buster is the Best Blog on Blogger Tutorials. Gadgets For Blogger is a directory which list all useful gadgets that can be used on blogger. Amanda also designs templates which can be found at Blogger Buster Designs and she also has made some premium templates at Theme Forest

Some Other Sites on Blogger Tutorials

  1. Blogger Tricks
  2. Anshul Dudeja
  3. Techie Blogger

Blogger Templates


Klodian

He is the person behind Deluxe Templates. He is now a good friend of mine and he has got a good collection of Blogger Templates.Some of these were inspired from Wordpress and other templates.All of these templates are perfectly coded and you can get them from his blog.

Dante

Dante has some truly original Blogger Templates at his blog.(Dante Araujo) . I really love his templates because they are so original. and elegant .He has got some really elegant templates that serve as image galleries. I haven't even seen any wordpress template to match those gallery templates. All of these blogs are powered by blogger.

Other Template Resources

Another great resource for Blogger Templates is Btemplates . Its actually the biggest collection of Blogger Templates which are organized well into categories and tagged properly so that you can find the best one out of them.

You can also check out my bigger list of Blogger Template Resources .

There are many other good resources for blogger. These are just my personal favourites.
Source: http://www.bloggerplugins.org/2009/09/best-blogger-resources.html

Post Summaries on Blogger With Read More

Blogger is fulfilling some of our expectations. Now blogger officially supports Post Summaries With Read more.This means that you wont need any JavaScript and CSS based tricks to display post summaries on Non-Post Pages.

How Does This Work

Blogger has introduced something called jump breaks. This will help you in creating the summary. What is a jump break? - Jump break is a special tag which can be inserted anywhere in a post using the post editor.When you have inserted a jump break into a post, the portion of the post above(or before) the jump break will serve as the summary of the post. This means that only this smaller portion will be displayed on Non-post pages.

How to insert a jump break?

If you are using the New Advanced Post Editor, then you can insert the jump break easily from the post editor.

If you are not using the New Post editor,then you will have to manually type the jump break tag . To do that just place <!-- more --> [Note that there is a space before and after more.] at the position where you want the break to occur. Now try going to your home page,and only the summary would be displayed on the home page.You might get problems seeing the Read More Link if you are using a modified and highly customized template. In that case try the following adjustments. Go to your Blogger Design > Edit HTML and "Expand the Widget templates". Now check if the following code is already present in your templates
    <b:if cond='data:post.hasJumpLink'>

<div class='jump-link'>
<a expr:href='data:post.url + &quot;#more&quot;'><data:post.jumpText/></a>
</div>
</b:if>
If this code is not present in your template,then add this code before
Now it should work properly.. If it doesn't,then leave a comment here and i will try to help you out..

Changing the Read More Text

By default the read more link text is Read more » . You can change this to whatever you like. To do that, Go to Blogger Layout / Design > Page Elements and click on the Edit link on the Blog Posts Widget. image Change the Post Page Link Text and Save the Settings..

Drawbacks of the New Feature

For the post summaries to work effectively, you have to edit each of your posts and add the jump link in each of them. Blogger wont generate summaries automatically.:(

Permalink:Post Summaries on Blogger With Read More


Source: http://www.bloggerplugins.org/2009/09/post-summaries-on-blogger-with-read.html

Numbered Page Navigation For Blogger

Page Navigation is a really awesome and long awaited feature. You might have seen numbered page navigation on many wordpress blogs(wp-pagenavi by Lester Chan). Muhammad Rias of Techie Blogger had already developed a page navigation system for blogger.It really was an awesome trick which was made at a time when nobody could even think of implementing it on blogger.It had some minor bugs and now Abu Farhan has perfected it and he has now given us the perfect page navigation solution.Here is a little screenshot of what this is all about. blogger page navigation

When you use this hack,you will see this kind of navigation on your blog’s home page and label pages(needs little customization).

Implementation of Blogger Page Navigation

Those who are bad at HTML modifications can use my one click installer :)

Add Recent Posts Widget 

After installing this widget proceed to the label fix.

The Complex Method. :P

If you installed the widget you shouldn’t be here.. Scroll down to the label fix.

1.Login to Blogger Dashboard and navigate to Layout > Edit Html

2.Don’t click the checkbox which says ‘Expand Widget Templates’

3.Now find


and replace it with


.showpageArea a {
text-decoration:underline;
}
.showpageNum a {
text-decoration:none;
border: 1px solid #cccccc;
margin:0 3px;
padding:3px;
}
.showpageNum a:hover {
border: 1px solid #cccccc;
background-color:#cccccc;
}
.showpagePoint {
color:#333;
text-decoration:none;
border: 1px solid #cccccc;
background: #cccccc;
margin:0 3px;
padding:3px;
}
.showpageOf {
text-decoration:none;
padding:3px;
margin: 0 3px 0 0;
}
.showpage a {
text-decoration:none;
border: 1px solid #cccccc;
padding:3px;
}
.showpage a:hover {
text-decoration:none;
}
.showpageNum a:link,.showpage a:link {
text-decoration:none;
color:#333333;
}
]]></b:skin>

This is the CSS part which defines the look and feel of the page navigation.You can modify it according to your need


4.Next is the JavaScript part. Find


and replace it with


<!--Page Navigation Starts-->
<b:if cond='data:blog.pageType != &quot;item&quot;'>
<b:if cond='data:blog.pageType != &quot;static_page&quot;'>
<script type='text/javascript'>
var pageCount=5;
var displayPageNum=5;
var upPageWord =&#39;Previous&#39;;
var downPageWord =&#39;Next&#39;;
</script>
<script src='http://bloggergadgets.googlecode.com/files/blogger_pagenavi_min.js' type='text/javascript'/>
</b:if>
</b:if>
<!--Page Navigation Ends -->
</body>

As you can see,there are some customizable parameters in this code

var pageCount=5;

This code determines the number of posts that would be displayed per page.

var displayPageNum=5;

This code determines the number of additional page navigation numbers that will be displayed on the page.

var upPageWord =&#39;Previous&#39;;
var downPageWord =&#39;Next&#39;;

These two lines determine the text that would be shown for the previous page and next page respectively.


Label Fix


Now we have another problem.By default,the blogger label pages will show 20 posts.We will have to cut this down to the value that we gave for the variable pageCount (or the posts per page).For this we will have to edit our template


How to Edit the template to cut short the posts per page?


Go to the Edit HTML page and expand the Widget Templates


Now find each occurrence of

'data:label.url'

(including the quotes) and replace each of it with

'data:label.url + &quot;?&amp;max-results=5&quot;'

Here 5 is the number of posts to be displayed per page.


Now if you are using the label cloud widget by phydeaux3,then find

a.href = &#39;/search/label/&#39;+encodeURIComponent(t);

and replace it with


Here also 5 is the number of posts to be displayed per page.


Now you should have the Blogger Page Navigation working perfectly on your blog. :)


This tutorial is based on Codes from Abu Farhan and Muhammad Rias. So if you plan to write this tutorial on your blog,do link back to them also.


Permalink: Numbered Page Navigation For Blogger


Update 30/03/2012  : If Page Navi is not working, change http://blogergadgets.googlecode.com/files/blogger-page-navi.v1.js to http://bloggergadgets.googlecode.com/files/blogger_pagenavi_min.js


Source: http://www.bloggerplugins.org/2009/09/numbered-page-navigation-for-blogger.html

Show avatars on Blogger Comments

Blogger is now introducing features every day as part of its 10th birthday celebrations.Now it has formally announced the Blogger Comment avatars. To know what it means take a look at the comments here on this blog and you will see the profiles pictures of the commentators near to the comments.If you are using some default blogger template things would be much easy.Here is a little screenshot of the new feature.

Implementation of Comment Avatars

1.First of all Go to Blogger > Settings >Comments and enable “Show profile images on comment”

2.Now if you have a normal un customized template you will see the avatars on the comments on your blog.

3.If you have a customized template you will have to add some codes and play around with your template.For that first go to Blogger Layout >Edit HTML and backup your template.

4.Expand the widget templates and check if you can find this line there

<dl expr:class='data:post.avatarIndentClass' id='comments-block'>


If you can’t then that means we have something to do..


If you couldn’t find this,then do the following steps.


a)Find


<dl id='comments-block'>


and replace it with


<dl expr:class='data:post.avatarIndentClass' id='comments-block'>


b)Now Find all occurrences of


<a expr:name='data:comment.anchorName'/>


and replace each of it with


<b:if cond='data:comment.favicon'>
<img expr:src='data:comment.favicon' height='16px' style='margin-bottom:-2px;' width='16px'/>
</b:if>
<a expr:name='data:comment.anchorName'/>
<b:if cond='data:blog.enabledCommentProfileImages'>
<div expr:class='data:comment.avatarContainerClass'>
<data:comment.authorAvatarImage/>
</div>
</b:if>


If you are using the author comment highlighting trick and if doesn’t work out with that trick,then leave a comment and i will try to help you out..


Further Styling.


If you want to add a default avatar for the ones with no profile pics,then place the CSS code just above


]]></b:skin>


CSS Code


.avatar-image-container {background:url(https://blogger.googleusercontent.com/img/b/R29vZ2xl/AVvXsEgaAHsNKjQX1LNkG_yIhg-njSgoShMEl2uKIoCr7P_xaUgX8U_dbTxwBD35GwgO-WXILwI6qhyphenhyphen9jWzC7ZZyTcSkTU-6rOglp7XT7IwpnUXTrtqmzkLT-g-QzK6L3x_BhVEIrEyi_bpMzg/s400/default.gif); width:35px;height:35px; }
.avatar-image-container img { border:none;}


You can customize the CSS according to what you need.


If you need bigger avatars instead of smaller ones,then use the following CSS instead of the one above.


.avatar-image-container{width:50px;height:50px;margin-top:-5px;}
.avatar-image-container img {background:url(https://blogger.googleusercontent.com/img/b/R29vZ2xl/AVvXsEj0TFldnApXOnOY5UUtYpwgIRNk7fX3Y__DzAwlg8snX1xE67DI97SoDFcBrPaZvYpgAc0DeyzpeDvklvEwnHE6LgT2PRX7twORJDZKNVcbg2GZY-_POYYS8akZygN_9NSdXpixcd-njD8/s400/grav.png);width:50px;height:50px;}


This will give you a bigger avatar and also a default gravatar image but it has a little drawback.It will also resize the small blogger favicons to a big size.(blooger favicon is displayed when a blogger user doesn’t have a profile avatar.Similarly OpenId also has a similar small icon.. ).


BTW to set you avatar pic you can use two methods.You can choose the edit profile link on your blogger profile and upload an image there,The second method is to enter a blogger comment somewhere in any blogger comment form and then click the Preview button instead of the Post Comment button.Now you will see an option to upload your avatar.


In case anything bad happens restore the template backup.. and comment here..:)


Permalink: Show avatars on Blogger Comments


Source: http://www.bloggerplugins.org/2009/09/show-avatars-on-blogger-comments.html

A New Make over

Hi guys, today i have tried to improve the look of this blog. We now have a new template specially designed and coded for this blog. First of all i would like to thank my friend Klodian of Deluxe Templates for helping me in coding this template.He is just awesome. Thanks a lot buddy for your valuable help and support..

What do you think of this new make over?
Give me your feedback guys :)

Source: http://www.bloggerplugins.org/2009/10/new-makeover.html
 
Play : Agame | Y8 Games | Y3 Games
Copyright © 2011. Blogger Tips And Tricks 2012 - All Rights Reserved

Proudly powered by Blogger