Tweet This - Text Link for Blogger

Tweet This Text Link for Blogger

The Official Twitter Tweet Button has 3 default styles(2 of them with a counter and one without) . The Button works with JavaScript and is not fully Customizable.This post is for all those who want to customize, the tweet button and change it into a simple Text link. The output will be a simple HTML link with all the features if the Tweet Button(excluding the count)

How to add the Tweet This Text Link to Blogger?

1. Login to your Blogger Dashboard and Navigate to Design > Edit HTML
2. Click on the Check box which says “Expand Widget Templates”
3. Now Look for
<data:post.body/>


and immediately after that line paste the following code(Edit the code if needed)


<a expr:href='&quot;http://twitter.com/share?text=&quot; +data:post.title+ &quot;&amp;url=&quot; + data:post.canonicalUrl + &quot;&amp;via=twitter&amp;related=bloggerplugins:Widgets and Tutorials for Blogger&quot;' style='float: left; background: url(https://blogger.googleusercontent.com/img/b/R29vZ2xl/AVvXsEiO2iBJgNUDKtjvqbAw2uzyFwKoYLchX8qfSQvMTKLqj4SlZRr8-WvkN6tNN16FR_R0Ht2ZRfRiDS-dE5huruJWXjAs_qwIxwBG55jIz67ZdGWDJSwvdRg92tINSiHAEHBSlzmbGQq2YA/[3].png) left no-repeat; padding-left: 20px;' title='Share on Twitter' rel='nofollow' target='_blank' >Tweet This</a>


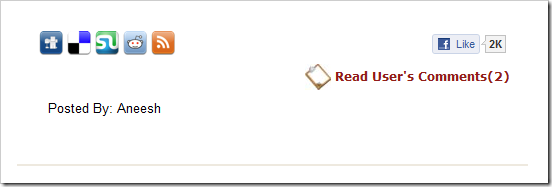
Save the Template and you should see a Tweet This link below each of your posts like this


Tweet This


Optional Edits


1. You can edit via=twitter with your twitter user name. So if your twitter username is john, then change via=twitter to via=john


2. You can also edit related=bloggerplugins:Widgets and Tutorials for Blogger .You can replace bloggerplugins with a twitter handle that you would like to recommend. You can replace Widgets and Tutorials for Blogger with a description of the recommended account


3. You can also edit Tweet This with the text you want  to see on the link


Source: http://www.bloggerplugins.org/2010/08/tweet-this-text-link-for-blogger.html

New Facebook Like button for blogger

Facebook Like Button For Blogger Facebook has now released an improved version of its like Button. The new Facebook like button looks like  the horizontal version of the Official Tweet Button. The Facebook Like button will show the no of likes just like the tweet button does.The like button has some changes from the older version in the way the user is allowed to like and unlike.

A Screen Shot of the New Like Button

image

Integrating the New  Like Button into your Blog

1. Blogger – Login to  your Blogger Dashboard, Navigate to the Edit HTML tab under Design and follow the instructions at this page (It also has instructions to upgrade your old like button to the new one)

2.Wordpress – Edit your  Wordpress theme and insert the following code into your Wordpress Post Loop(If you want it to appear on Post pages only, then edit single.php.Otherwise you will have to edit multiple theme  files)

<iframe src="http://www.facebook.com/plugins/like.php?href=<?php echo urlencode(get_permalink($post->ID)); ?>&amp;layout=button_count&amp;show_faces=false&amp;width=450&amp;action=like&amp;colorscheme=light&amp;font=arial" scrolling="no" frameborder="0" allowTransparency="true" style="border:none; overflow:hidden; width:450px; height:40px;"></iframe>


Parameters


1.layout=button_count will provide you with the new like button.If you change it to layout=standard , then you will get the older version of the like button


2. show_faces=false If you set this parameter to true(show_faces=true), then it will show faces of those who like your post


3.There are three different color schemes available . The code has the light color scheme. To use the other two color schemes change colorscheme=light to colorscheme=dark or colorscheme=evil


4.you can also change the font used by changing the font parameter


You can change font=arial to any of


  1. font=lucida+grande


  2. font=segoe+ui


  3. font=tahoma


  4. font=trebuchet+ms


  5. font=verdana


5.To change the text that appears on the button, you can change action=like to action=recommend


Do you like the new version of the Like Button? Let me know!
Source: http://www.bloggerplugins.org/2010/08/new-facebook-like-button-for-blogger.html

How to Add Tweet Box to Blogger

image It has been a long time since @Twitter released the @AnyWhere Developer Tool. AnyWhere allows you to seamlessly integrate Twitter into your site using a few lines of JavaScript. You can read more about it at  @AnyWhere Developer Page. Tweet Box is one such @AnyWhere Application, which allows you to add a 140 char Tweet Box onto your blog.

Here is a screen shot of how the Tweet box appear on my Previous Post.

image

Hope that now you got a good idea of how this works, If not scroll down to the bottom of the post and see it in live action :)

How to add the Tweet Box on a Blogger Blog?

1. Go to the @AnyWhere Developers Page and create an Application there with your blog details.

image

Make Sure that you have checked the Read & Write Option when you Register your Application

2.When you complete the signup process, you will get some JavaScript codes, with a unique  API Key

Copy out the JavaScript from there(the code in the red box) as shown in this Screenshot.

image

3.Now Login to your Blogger Dashboard and navigate to the Edit HTML Tab under Design and “Expand your Widget Templates”

4.Look for

</head>

and paste the copied Twitter JavaScript just above that line and save the template.


5.Now look for


<data:post.body/>

and immediately below that paste the following JavaScript Code and save your template. (Editable parts are shown in red)


<b:if cond='data:blog.pageType == &quot;item&quot;'>
<div id='bp_tweetBox'/>
<script type='text/javascript'>
bp_tweet_link=&quot;<data:post.url/>&quot;;
twttr.anywhere(function (T) {
T(&quot;#bp_tweetBox&quot;).tweetBox({
width: 560,
label: &quot;Share the L&#10084;ve  &amp; Retweet&quot;,
defaultContent: &quot;RT @bloggerplugins <data:post.title/>&quot;+&quot; &quot;+bp_tweet_link
});
});
</script>
</b:if>


Now you should see the Tweet Box on all of your post pages


Currently, this doesn’t do any URL shortening . You can expect that it my next post. I will  also try to post about the other @AnyWhere features soon :)


Share your opinions and if you have any questions about the tweet button, feel free to ask :)


Source: http://www.bloggerplugins.org/2010/08/add-tweet-box-to-blogger.html

Popular Posts & Blog's Stats widgets for Blogger

popular

It has been almost 2 months since Blogger introduced the “Stats” feature. Now they have gone a step further by introducing 2 Gadgets related to the “Stats”. Blogger has now got a “Popular Posts” Gadget and a “Blog’s Stats” Gadget.(These are currently available only on Blogger in Draft).

Popular Posts Gadget

Blogger has always lacked such a gadget. There used to be some Yahoo Pipe based widgets, which list out the most commented posts. But these were pretty slow and inefficient. Now Blogger has got this Official Popular Posts Gadget.As the name indicates, the Gadget displays a list of popular posts on your blog.  Here is a Screen Shot of the Gadget Options image


Blog’s Stats Gadget

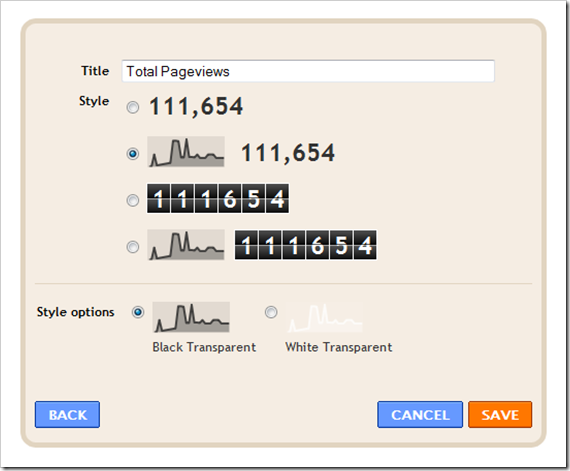
The Blog’s Stats Gadget displays your Blog’s stats in one of the different graphical(or textual) formats. The Gadget Options will give you a better idea

image


How to add these Gadgets to your blog?

These Gadgets are not available in your regular Dashboard. So login to Blogger in Draft at http://draft.blogger.com . Now Go to Design > Page Elements and Click on the “Add a Gadget Link” and you will see the 2 new Gadgets

image

What do you think of the ne Gadgets?


Source: http://www.bloggerplugins.org/2010/09/popular-posts-blog-stats-widgets.html

Embed Picasa Slideshow in Blogger

There are many photographers out there who wish to display their picasa albums in a Blogger Post. It’s actually quite simple to add a picasa slideshow. If you are noob, then these steps might help you.

1. Login to Picasa Web, and Navigate to your Album.

On the Right side you will see a “Link to this Album” link. Click that

image

2. Now Click on the Embed SlideShow Link

image

3. From the overlay window, adjust the Slideshow settings

image

and copy the Embed Code.

4. 1 If you want to have the Slideshow embedded into a Blog Post, then follow these steps else branch over to 4.2

a. Login to your Blogger Account, and Edit/Create a post:

Switch to the Edit HTML(or HTML) mode, and paste the copied embed code into the post editor.

image

image

The embed code has a width parameter and a height parameter (something like width="288" height="192" ). You can adjust these parameters to set the height and width of the slide show.

b. You can switch back to the “Compose” mode to edit the rest of the post.

c. Publish the post and the slideshow is now live on your blog :)

4. 2 If you want to add the Slideshow to your sidebar

a. Then login to Blogger and  Go to the Layout Page (or Design > Page Elements)

and click on the Add a Gadget Link and then add an HTML/JavaScript Gadget.

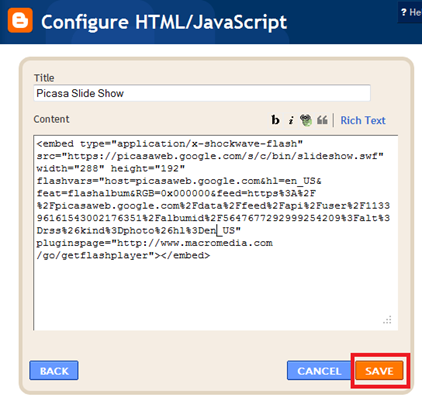
b.Paste the Copied Code into the Gadget and Save it with an Appropriate Title

image


c. The Slideshow is live on your blog as a Sidebar Gadget.


Source: http://www.bloggerplugins.org/2010/09/embed-picasa-slideshow-in-blogger.html

Random Posts Widget for Blogger with Thumbnails

Random Posts Widget for Blogger with Thumbnails

The Random Posts Gadget will  display a list of Random Posts(from your blog) on your Blog’s Sidebar. The Gadget has an options panel and can be configured to meet your needs. The Gadget inherits styles from your Blog. But you can override the colors if you want(this was done to support third party templates which doesn’t have the skin variables properly designed).


random-posts-gadget

About the Various Options

Maximum Length of Post Title – Your post titles can be too long. In that case you can limit the title to x  number of characters using this parameter.

Snippet Style – You can display the snippet with Post Summary, Post Thumbnail , or both or none. 

Feed – The default Option “Summary Feed” will scan your post summary feed. This is the faster and efficient option and i would advise you to opt this one. If you choose  “Full Feed” , the gadget will be slower but you will get YouTube Thumbnails also.
Note:- If you want to grab the images or YouTube thumbnails, then you should have “Site Feeds” set to Full. If you opt for the Media Thumbnail only, then the short feed will be used by default.

Thumbnail Dimensions – Size of the Thumbnail in pixels. The gadget doesn’t generate any Thumbnail. It just uses the media thumbnail,YouTube thumbnail , or any image in the post and scales it to the specified dimensions

Summary Length  -  If you have opted to display the post Summary, then you can control the length of the summary(in characters)

Post Meta Style – You can display the Post Date, Comment Count and a Read More Link.You can choose any combination of these three.

Font  and Font Size– By Default, the container’s font  and Font Size is inherited into the Gadget. But if you are using a 3rd party template, then these might not be properly inherited. In that case you can use this Option to over ride these parameters.

Extra Styling – Allows you to specify the position of the Thumbnail, and whether to underline the links or not.

Border Color – You can either opt for No Border, or select one of the 140 available colors. If you  are not sure about how these colors look like, then take a look at this color chart at W3Schools - http://www.w3schools.com/html/html_colornames.asp 

Link Color and Text Color – By default , the colors will be inherited from your Blog. If you want to override this , you can choose one out of the 140 different colors.

(The colors were provided in the Dropdown(and not as text fields) to tackle a problem with the API)

Read More Text – This field was intentionally added to help blogs which are not written in English. Initially i used  “More »” as the Read more text without taking any user Input. Seeing this on a non- English Blog is a little awkward. So i added this new field :)


Add The Gadget to your Blog

Check out the Demo and Sample Configurations to see what  the Gadget can do. 

Demos

Credits:Thanks to Kannan of http://cre8tivenerd.com/ for the gadget image

Waiting for your Feedback and Suggestions :) . If you like the gadget, share it and spread the word :)


Update:


just updated the recent posts and random posts gadgets. Some blogger methods were deprecated(not sure if it is temporary) and so an update was necessary. these gadgets are cached on to the blogger servers and so may take time to reflect onto your blogs. If you can't wait then remove the gadgets and add them using the following links
Random Posts - http://go.bloggerplugins.org/r​andom2
Recent Posts - http://go.bloggerplugins.org/r​ecent2


Source: http://www.bloggerplugins.org/2010/09/random-posts-widget-for-blogger.html

Replace Page List Menu Gadget with a Link List

The Default Blogger Templates(which can be customized using the Designer) are all made to use the “Blog Pages” as your Blog’s Top Navigation Menu. This is done using a Page List Gadget. But , you might want to setup your own menu with Custom Links. In that  case, you can replace the Page List Gadget with a  Link List. This tutorial guides you on how you can replace the Page List with a Link List without loosing the Menu Styling(and the highlighted active links)..

How do i add non-page links to my Menu

This is a frequently asked question on the Blogger Help Forum. The solution is simple, if you want to display anything other than page links on your Menu, then you will have to use a Link List Gadget instead of using a Page List. If you are using one of the Default Blogger Templates, and if you have added a Page List Gadget below the header, you will be using "Page" links as the Navigation Menu. To change this to a Link list, follow these simple steps.

1. Login to your Blogger Account and navigate to the Design > Edit HTML tab. Do NOT check the “Expand Widget Templates” Option.

2. Now look for(Ctrl + F)

<b:widget id='PageList

and you will find some line  like

<b:widget id='PageList1' locked='false' title='Pages' type='PageList'/>


3. Replace this line by the following Code


<b:widget id='LinkList123' locked='false' title='Menu' type='LinkList'>
<b:includable id='main'>
<div class='widget-content PageList'>
   <ul>
     <b:if cond='data:blog.url == data:blog.homepageUrl'>
     <li class='selected'>
     <a expr:href='data:blog.homepageUrl'>Home</a>
     </li>
     <b:else/>
     <li><a expr:href='data:blog.homepageUrl'>Home</a></li>
     </b:if>
     <b:loop values='data:links' var='link'>
       <b:if cond='data:blog.url == data:link.target'>
       <li class='selected'>
       <a expr:href='data:link.target'><data:link.name/></a>
       </li>
       <b:else/>
       <li><a expr:href='data:link.target'><data:link.name/></a>
       </li>
       </b:if>
     </b:loop>
   </ul>
   <b:include name='quickedit'/>
</div>
</b:includable>
</b:widget>


4. Save the Template.


5. Now you can manually add links to the Menu by using the Quick Edit Wrench Button .


The Styling of the Gadget will be preserved and the Active links will be highlighted.


Source: http://www.bloggerplugins.org/2010/09/replace-page-list-gadget-with-link-list.html
 
Play : Agame | Y8 Games | Y3 Games
Copyright © 2011. Blogger Tips And Tricks 2012 - All Rights Reserved

Proudly powered by Blogger