How to Disable the Blogger Light Box

Disable Blogger Light BoxAs of now there is no Official Method to Override the Lightbox, and it is enabled on all of the Blogger Blogs. If you don’t like the Light Box, and want to remove it from your Blog, then read on:

Update:

Blogger has now added an option to disable the Light Box. The feature is enabled by default. You can turn it Off from Settings > Posts and Comments. You just have to set “Open images in Lightbox” option to “No”

Now Click on the “Save Settings” Button

Update: Blogger has Rolled back the Light Box Feature. So there is no point in reading further.

Go to Template > Edit HTML and paste the following Code Snippet above </body>

<script type='text/javascript'>
document.getElementById('Blog1').id = 'Blog222';
var bp_dummy = document.createElement("div");
bp_dummy.id = 'Blog1';
bp_dummy.style.display='none';
document.getElementsByTagName("body")[0].appendChild( bp_dummy );
</script>

In this Code, Blog1 is the id of your Blog Posts Widget.

Save The Template, and LightBox wont be bothering you anymore :) I use the same technique here on my Blog :)


Source: http://www.bloggerplugins.org/2011/09/disable-blogger-light-box.html

Light Box Update

Blogger has added an option to enable/disable the Light Box Feature. Those who want to disable these overlay displays can easily do that from the Blogger Settings Menu. To know more read Disable Blogger Light Box


Source: http://www.bloggerplugins.org/2011/10/light-box-update.html

Google Analytics in Blogger

Blogger has added a new option to easily integrate Google Analytics with your Blog.

To Add your Google Analytics Tracking code, you just need to specify your Google Analytics Account number in your Blogger Dashboard. To do that Go to Settings > Other and fill up  the “Google Analytics Account number” field, Once done Save the Settings. Now Blogger will automatically add the analytics tracking code to your blog(even on the mobile version).

Adding The Analytics Account number in Blogger

Go to Settings  > Other and provide your Google Analytics Account number.

image

Click the Save Settings Button when done.

If you are using a Custom template, then you might have to apply the fix mentioned at the end of the tutorial.

If you don’t know your Analytics Account number, then read on:

1. Login to analytics

2. Now Click on the Edit Link to the right of your Blog’s profile(If don’t yet have a Website  profile, then you can create one)

image

3. Now you will be taken to a page like :

image

4. Click on the “Check Status” link

You will see a screen like

image

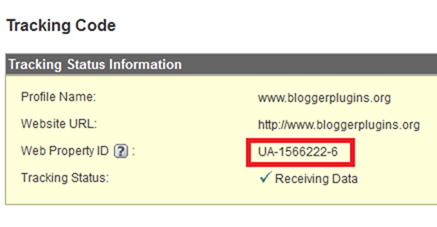
5. Copy the Web Property ID from there. That’s your Analytics Account number which you can provide in the Blogger Settings.

Fix:

If you are using a custom template, then the Google Analytics code might not be added to your Blog. To check that Edit your template(Template > Edit HTML) and look for(Ctrl + F or Cmd +F)

<b:include name='google-analytics' data='blog'/>

If it is not there in your template, then add it above

</body>

Source: http://www.bloggerplugins.org/2011/10/google-analytics-in-blogger.html

Edit Blogger Mobile Templates

There is some Good news from the Blogger Team on the Blogger Code Blog. If you have enabled the Mobile Templates, you will be able to customize the Blogger Mobile Template by using CSS definitions. You will also be able to control which widgets are to be shown and which shouldn't. You can also configure the widgets to show an alternate content in the mobile view.

Though this looks so promising, I was not able to test all of these features.

Where to Start?

Go to Template and Click on the Gear Icon below the Mobile Template. From the Dropdown opt for “Custom”, Preview the mobile template  and Save it. 

image

Customizing the structure of your Mobile Template.

Blogger Templates are made up  using Widgets.Blogger has added a new property(mobile) to the <b:widget/> tag. This property can take values ‘default', ‘yes', ‘no' or ‘only'. And this property will determine how the widget will be rendered in the mobile view.

The widgets that display on mobile by default are the following:

  • Header
  • Blog
  • Profile
  • PageList
  • AdSense
  • Attribution

If you want to hide any of those, then use the property mobile='no' in the Widget tag, and that widget would no longer appear in the mobile view.

For example I can hide the Attribution Gadget in Mobile view if I use

<b:widget id='Attribution1' locked='true' mobile='no' title='' type='Attribution'/>

If you want  to display the non-default widgets in your Mobile view, then just set the mobile property to yes.


E.g.: this is the normal tag for the Blog Archive Widget

<b:widget id='BlogArchive1' title='Blog Archive' type='BlogArchive'>

Now if you set the mobile property as

<b:widget id='BlogArchive1' title='Blog Archive' mobile='yes' type='BlogArchive'>

, then you should see the archive widget on your Mobile View(I didn't get it working).


If you want a widget to appear only in the mobile view, then you can set the mobile property to 'only'

<b:widget id='Attribution1' locked='true' mobile='only' title='' type='Attribution'/>

If I use this tag, the attribution gadget will disappear from my desktop view, and will appear only on the mobile view.


This code change will make the attribution widget disappear from your Mobile View.


Customizing the Look and Feel of your Mobile Template


Now you can fully customize the looks of your mobile template. The body element of the mobile template will be styled my the mobile class

<body class='loading mobile'>

Make sure that your template has:

<body expr:class='&quot;loading&quot; + data:blog.mobileClass'>

So if you are good at CSS, you can use this class name to style your mobile template.

.mobile .date-header {
text-decoration:underline;
}


Alternate Widget Content on Mobile View


Once you switch to the Custom Mobile Template, you might find that the template is too huge to fit into a Mobile Browser. If you want, then you can provide alternate content inside a widget.


e.g:

<div class="widget-content">
<b:if cond="data:blog.isMobile">
<!-- Show a text link in mobile view.-->
<a href="http://www.blogger.com">
Powered By Blogger
</a>
<b:else/>
<!-- Show an image link in desktop view.-->
<a href="http://www.blogger.com">
<img expr:src="data:fullButton" alt="Powered By Blogger"/>
</a>
</b:if>
</div>

This will show a Powered by Blogger Text link on the Mobile View, and a Powered by Blogger image on the normal desktop view.


The condition


<b:if cond="data:blog.isMobile"/>


can be used to check if the viewer is viewing your blog in a mobile browser or not. You can use this conditional check creatively and give a totally different look to the mobile version of the blog. Happy hacking, and do share if you have created some really awesome mobile template :)


Source: http://www.bloggerplugins.org/2011/11/edit-blogger-mobile-templates.html

Profile Picture in Google Search Results

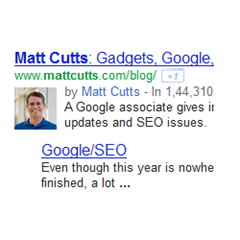
imageYou might have noticed Google search results  includes information about the author. It has a link to the Author’s Google Plus Profile and it also displays the Author’s Profile Picture.This tutorial will guide you in doing the same with your Blog.

Before we Start, here is a preview of what we are talking about

image


How to Make Google Know that you are the Author of a Blog ?

This process involves kind of a two way verification. In your blog you should tell the Google Crawlers that  this guy with this Google Profile is the author of the entry.

Now Google has to verify that the Blogger has provided the correct Google Plus Profile.So it will see if that guy’s Google Plus profile links back to your Blog. If it does, then Google can confirm that he/she is the author and it may display his/her profile information in the Google Search Results.

Note: Even of you do all this, there is no guarantee that Google will display your Profile Details in search.

Now lets’ try doing it

There are two methods of setting up this two way verification. We will have a look at simplest of those

a. For a Single Author Blog.

Every page on your Blog should tell Google that this Google Plus guy is my Author. To do that, there should be a link to your Google Plus profile on every page on your Blog. This link should have the rel attribute set to author

You can do that by adding the following link code to some HTML/JavaScript Widget

<a rel="author" href="https://plus.google.com/109412257237874861202">My Profile</a>

The Link in red should be replaced by your Google Plus Profile URL. You can replace the thing in Green with anything you want.  When you add this as an HTML/JavaScript Widget, you are telling Google that every page on your Blog was written by the guy with the Google Plus Profile which you have mentioned in the link. It is not mandatory that you should add this link in a Gadget. You can add the link anywhere in your Template. The only thing is that it should be there on every page of your Blog.

Now we have to help Google in conforming this.To do that  your Google Plus profile should link back to your Blog’s home page.

So Edit your Google Plus Profile and add a link to your Blog’s Home Page.

image

Now you have successfully completed the steps. Read the last part of this post to know how you can verify if you did everything right.

b. For a Multi Author Blog.

The method is almost the same for a Multi Author blog as well. The only difference is that each post on the Multi Author Blog should link to the corresponding author.

If you are not good with Blogger Template Codes, then you can manually add the Google Plus profile link to each Post(so that each post will link to the corresponding author’s Google Plus Profile). If you are good with the template codes, then you can use the following code.

<b:if cond='data:blog.pageType == &quot;item&quot;'>
<!—repeating block –>
<b:if cond='data:post.author == &quot;Author1Name&quot;'>
<a rel="author" href="https://plus.google.com/109412257237874861202">My Profile</a>
</b:if>
<!/—repeating block –>
<b:if cond='data:post.author == &quot;Author2Name&quot;'>
<a rel="author" href="https://plus.google.com/109412257237874861202">My Profile</a>
</b:if>
</b:if>

Author1Name and Author2Name should be replaced by the  name of the Authors(their Blogger Name). The red links should be replaced by the Google Plus Profile  link of the corresponding Author. You can change the green text to anything you want. If you have more than 2 authors, you can just repeat the repeating block.(I have commented it so that you can properly identify the repeating one).

You have to pasted this code in your template below

<div class='post-footer-line post-footer-line-1'>

or

<p class='post-footer-line post-footer-line-1'>

or

<data:post.body/>

Now each of the Blog Author’s Google Plus Profile should link back to your Blog’s home page.

Verifying if everything worked properly

You can use the Rich Snippets Testing Tool to verify if you have done everything properly. Give a post URL in the text box at http://www.google.com/webmasters/tools/richsnippets and preview how your page will appear on the search engine. You should see something like this when you do a preview.

image

Asking Google To Consider displaying your Profile in Search Results

Now you have successfully added the Author snippets to your Blog. This doesn’t mean that Google will start to show your Profile details right away. We don’t know how they do it. Right now we only see these working for some quality blogs. Here is an authorship request form which might help you


Source: http://www.bloggerplugins.org/2011/12/profile-picture-in-google-search.html

Comment Spam Filtering and Comment Inbox in Blogger

blogger-comment-inbox Many of you might have noticed that Blogger has made some Cool Improvements to its Commenting System. Blogger has introduced an improved Spam Filter and a Comment Inbox. Most of you must have noticed the new “Comment” tab in your Dashboard (This may not be present on all blogs. Blogger is in the process of rolling out this feature to all users)
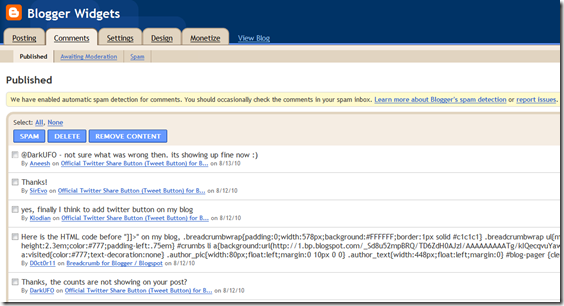
Comment Inbox

Blogger has introduced the “Comment Inbox” where you can view all the Comments published on your blog.The Comment Inbox has Sub tabs namely Published , Awaiting Moderation and Spam

image

Comment Spam Filtering

Most web forms are targeted my spammers and bots. Most Blogging Platforms have their own ways of keeping the bots and spammers away. Wordpress uses Akismet for this process.Blogger has its own filtering mechanism to keep the odd ones  out. Now Blogger improved its spam fighting mechanisms by integrating  Google’s Spam Filtering Technologies into Blogger. Blogger will automatically detect Spam comments and move them to Spam in your Comment Inbox. The comments in the Spam Inbox are not visible in your blog. You can mark Comments as Spam and move them to the Spam Inbox.You can also mark comments as Not Spam that have been incorrectly classified  or marked as spam and the comment will be immediately published on to your blog.image

What do you think of the new additions?


Source: http://www.bloggerplugins.org/2010/08/comment-spam-filtering-comment-inbox.html

Tweet This - Text Link for Blogger

Tweet This Text Link for Blogger

The Official Twitter Tweet Button has 3 default styles(2 of them with a counter and one without) . The Button works with JavaScript and is not fully Customizable.This post is for all those who want to customize, the tweet button and change it into a simple Text link. The output will be a simple HTML link with all the features if the Tweet Button(excluding the count)

How to add the Tweet This Text Link to Blogger?

1. Login to your Blogger Dashboard and Navigate to Design > Edit HTML
2. Click on the Check box which says “Expand Widget Templates”
3. Now Look for
<data:post.body/>


and immediately after that line paste the following code(Edit the code if needed)


<a expr:href='&quot;http://twitter.com/share?text=&quot; +data:post.title+ &quot;&amp;url=&quot; + data:post.canonicalUrl + &quot;&amp;via=twitter&amp;related=bloggerplugins:Widgets and Tutorials for Blogger&quot;' style='float: left; background: url(https://blogger.googleusercontent.com/img/b/R29vZ2xl/AVvXsEiO2iBJgNUDKtjvqbAw2uzyFwKoYLchX8qfSQvMTKLqj4SlZRr8-WvkN6tNN16FR_R0Ht2ZRfRiDS-dE5huruJWXjAs_qwIxwBG55jIz67ZdGWDJSwvdRg92tINSiHAEHBSlzmbGQq2YA/[3].png) left no-repeat; padding-left: 20px;' title='Share on Twitter' rel='nofollow' target='_blank' >Tweet This</a>


Save the Template and you should see a Tweet This link below each of your posts like this


Tweet This


Optional Edits


1. You can edit via=twitter with your twitter user name. So if your twitter username is john, then change via=twitter to via=john


2. You can also edit related=bloggerplugins:Widgets and Tutorials for Blogger .You can replace bloggerplugins with a twitter handle that you would like to recommend. You can replace Widgets and Tutorials for Blogger with a description of the recommended account


3. You can also edit Tweet This with the text you want  to see on the link


Source: http://www.bloggerplugins.org/2010/08/tweet-this-text-link-for-blogger.html
 
Play : Agame | Y8 Games | Y3 Games
Copyright © 2011. Blogger Tips And Tricks 2012 - All Rights Reserved

Proudly powered by Blogger