Google+ : How To Download Photos and Videos?

Now you can simply click the white Download your data button or you can click the individual options below. The best is to download images, circles and contacts individually. Your shared videos will be in stream data so remember to download it too.

For downloading videos on Google+ remember that all videos will be uploaded on YouTube and then shared on your Google+ account. So you will need [a href="http://download.cnet.com/YouTube-Downloader/3000-2071_4-10647340.html" rel="nofollow" target="_blank"]YouTube downloader[/a] to download videos shared on Google Plus.

Source: http://www.mybloggertricks.com/2011/07/google-how-to-download-photos-and.html

Transfer Facebook Contacts To Google Plus - Trick!

         5.  Once you click the agree button all your yahoo contacts which includes your Facebook contacts will be added to Google+. You can now add them to circles and have fun sharing love and joy. Peace out! :>

Source: http://www.mybloggertricks.com/2011/07/transfer-facebook-contacts-to-google.html

Update Facebook Status From Google Plus!


post-on-facebook-from-google+If you have to login to both sites, Google+ for new taste of social networking and Facebook because some of us just can’t stop using Facebook and migrate to Google+ at once, then this trick is all about you! Although, Google has not yet come up with any of the G+ API that may provide a shortcut, but still we can try a work around to synchronize the Google Plus status with Facebook.

[a name='more'][/a]


Drawback: Only limited number of characters go to Facebook status, due to the email template of Google+. Therefore write short and precise one liner status on Google+ in order for it to appear on Facebook.


How To Post Status on Facebook From Google Plus?


Just follow the following simple steps…


Step 1: Go to [a href="http://facebook.com/mobile" rel="nofollow" target="_blank"]http://facebook.com/mobile[/a] and click the link that says: "Send my upload email to me now" . Then check your Inbox to get your personalized email address which will be used to post text, videos, and photos straight on your Facebook profile. This is something private for you, like unique id for every Facebook user. 


This Email ID will look something like this:


bgart580coarse@m.facebook.com


Step 2: Go to [a href="http://plus.google.com/" rel="nofollow" target="_blank"]https://plus.google.com/[/a] and then click Circles section where you can invite your friends to your G+ profile.


google circles


Step 3: [a href="http://www.mybloggertricks.com/2011/07/how-to-invite-friends-in-google-plus.html" target="_blank"]Create a new circle[/a], give any name to it for example like myfacebook , click add a new person


add a new person


and then write the email address you got in step 1. Add this person to the myfacebook circle that you just created.


Step 4: You are done, now whenever you are updating your stream/status at Google+, include your myfacebook circle that contains the Facebook email by clicking the link that says "Add more people".  See below


Google+ status


Remember to check the box that says "Also email 1 person not yet using Google+"


Since your Facebook email is not using Google+ so your status will be sent to Facebook via this email.


On Facebook your status will appear like this:


Post on Facebook from google


That's all! :)


Until you get any plug-in by developers, I think this is an interesting trick that clicked my mind today and thought of sharing it. If you face any problems just let me know.


Note: Sometimes the status doesn't appear on your Facebook profile so you must try different browsers. I recommend Google Chrome.


This was a Guest Post by Umair Ahmad khan @[a href="http://www.facebook.com/umairkhan.cis" rel="nofollow" target="_blank"]Facebook[/a]
Source: http://www.mybloggertricks.com/2011/07/update-facebook-status-from-google-plus.html

Customize Feedburner Chicklet Feed Count Text

feedburner readers

Choose a word that is equal to or less than 7 characters. Do not choose a long word as they will not fit in the button. Though you can edit the width but that will damage the look of the chicklet. Hope this little trick proves helpful to most of you. You are most welcomed to ask for any help if needed.

You can also create a completely custom feedburner chicklet button by reading this post:

  • [a href="http://www.mybloggertricks.com/2009/12/create-custom-follower-counters-for-any.html" target="_blank"]Create Custom Feedburner Counter[/a]
Source: http://www.mybloggertricks.com/2011/07/customize-feedburner-chicklet-feed.html

Create a Contact Form With File Upload Option

Keep your form simple with some important fields only like Name, Website URL, Email, Age, Country, Subject and Message. The form builder looks like this,

form builder

The form builder has blue buttons at left and display at right. When you click a button on left the effect is displayed on right. Now kindly follow as I instruct for keeping things simple and for creating a simple but informative contact form.

Follow this order:

  1. Click the Name button in advance section
  2. Next click Web site
  3. Next Email
  4. Next Hidden Field. Now click the hidden field section on the right and rename it as Age
  5. Next click Hidden Filed again and rename it as Country
  6. Next click File Upload  (Optional you can leave this option if you don't want users to send you files via email)
  7. Now From the Basic section click Paragraph Text & click it to rename it as Message
  8. To make a specific form option a must to fill then simply click that row and select required as shown below

edit form fileds


Your contact form now must look something like this:

contact-form

     9.   Click the Form Title and add some message there for your visitors. For example you can write :

We Love To Hear From You

Feel free to ask for any help. We will catch you back as soon as time allows

If you wish you can remove the form title by unchecking the box and deleting the description text. See below

contact form title

     10.    Now on the form settings choose Redirect URL and insert the page link of your thank you page. A thank you page is something [a href="http://www.mybloggertricks.com/2008/04/message-received-notifier.html" rel="nofollow" target="_blank"]like this[/a]
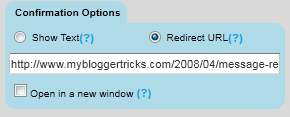
redirect contact form

You may create a separate post for this by giving it an old publishing date. Blogger users can create a Page instead of Post.    

11.  Now replace send Email by submit and align it to right as shown below:

submit button

  12.  Next click the Captcha Code at the bottom and select the none option from the left section as shown below:

remove captcha-code

This security code is often added to prevent spam but I have never used this security code and I honestly have received not even a single spam till today. Just remove it to make the contact form even more neater.

13.   Finally hit the Save Form Button and a window will appear as shown below:
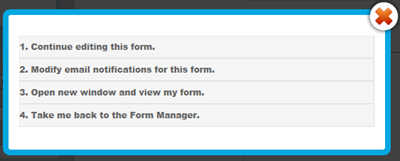
save form

14.   Choose the second option and add a recipient email ID. Choose an ID that you often use so that whenever someone leave a message you may receive it straight in your inbox. You can also add more than one recipients. See below:

add recipient

Leave other options as default. Hit Save! Now choose the third option.

save contact form

15.   In Form manager Click Code

contact-form-code

16.  Choose the HTML Only option and copy the code. Make sure to enter the URL of the page where you want to embed the contact form. See below
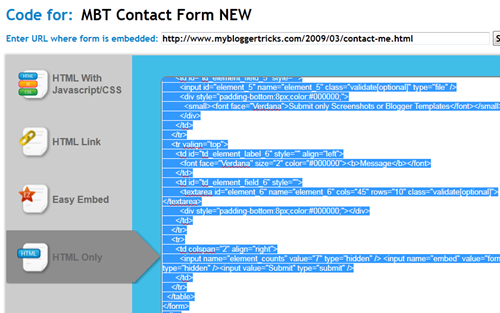
copy code

It is therefore better that first you create a Page on Blogger and publish it. Fetch its URL and paste it in the blank "Enter URL where form is embedded"

Now simply copy the code and paste it in your contact page. To delete the emailmeform logo from the contact form find and delete a similar code like the one below from the code you just copied.

  <div><font face="Verdana" size="2" color="#000000">Powered by</font><span style="position: relative; padding-left: 3px; bottom: -5px;"><img src=
  "http://www.emailmeform.com/builder/images/footer-logo.png" /></span><font face="Verdana" size="2" color="#000000">EMF</font> <a style="text-decoration:none;" href="http://www.emailmeform.com/"
  target="_blank"><font face="Verdana" size="2" color="#000000">Forms Online</font></a>
</div><a style="line-height:20px;font-size:70%;text-decoration:none;" href="http://www.emailmeform.com/report-abuse.html?http://www.emailmeform.com/builder/form/r99G329aiV6k6" target=
"_blank"><font face="Verdana" size="2" color="#000000">Report Abuse</font></a>

Publish the page and bingo you are done! I know the steps are lengthy but the result is indeed worth it. In my coming posts you will learn how to completely customize this contact form with your own colors and styles. See our contact form as an example. I just hope you may have found today's tutorial helpful. If you need any help please do not hesitate to post your question. Have fun buddies! :)

Note: Paste the Contact Form code in Edit HTML mode only and hit the publish button on blogger Post Editor. Do not toggle to compose mode because this will collapse the form.

You may also find our previous tutorial helpful:

  • [a href="http://www.mybloggertricks.com/2009/09/releasing-highly-stylized-contact-me.html" target="_blank"]Create Contact Form[/a]
Source: http://www.mybloggertricks.com/2011/07/create-contact-form-with-file-upload.html

Twitter Hacked - President Barak Obama Is Dead!

[a href="https://blogger.googleusercontent.com/img/b/R29vZ2xl/AVvXsEj7Ba1spa2JIPkwpkzMV9I_dLNwW_kshTe2M7X3DYV8gwwjEjnvbo7_taluK66YYjCIMsSpvf4lZl8Y89Ykx_nkl7_t3h24F_5lahK2szaE3QUWugY5Hl252JwbpzllZXTERhcgpjMWybA/s1600-h/fox%252520news%252520twitter%252520hacked%25255B4%25255D.png"]fox news twitter hacked[/a]

[a href="http://www.foxnews.com" target="_blank"]Fox News[/a] twitter feed was hacked on sunday 4th July 2011 by a group called Script Kiddies . False tweets reports were published that said : "Barack Obama has just passed. The President is dead. A sad 4th of July, indeed. President Barack Obama is dead."

[a name='more'][/a]

This false tweet remained for hours on twitter servers and around half of the twitter followers started spreading the news like fire! Almost everyone was shocked and some even took it for real. Almost all tweets have been deleted the hacked account is been restored. This has raised serious questions on Twitter security for its users. However some claim that may be someone succeeded in stealing the password and then he might have published the tweets. Fox news has asked for a detailed investigation from Twitter. The Attacker group was identified by [a href="http://www.bbc.co.uk/news/technology-14012294" target="_blank"]BBC NEWS[/a].

No matter whoever did this, I personally thing it is really funny of Fox news that someone accessed their secured servers and managed to steal a password. I don't know what the truth may be but this news today was shocking and funny at the same time. Let me know what do you know about this latest news.

Image credits:- screenshot by Stephen Shankland/[a href="http://news.cnet.com/8301-30685_3-20076650-264/fox-news-reports-twitter-hack-to-secret-service/" target="_blank"]CNET[/a]

Source: http://www.mybloggertricks.com/2011/07/twitter-hacked-president-barak-obama-is.html

Create & Design Custom Tabs on Facebook - Series Tutorial

Advantages of Woobox's Custom Facebook Page Tab App

Yes there will be no ads attached! No service links, banners, icons, no nothing.


I am sure with all these features anyone would enjoy creating a landing page for their website on Facebook. You can even create a complete website on Facebook with navigation and the only thing you would need is a free template design to help you to give a start to your imagination. Make sure you don't miss any part of the tutorial and subscribe now in oder to be informed via Email whenever a new tutorial part is published.

[a href="http://feedburner.google.com/fb/a/mailverify?uri=tntbystc" rel="nofollow" target="_blank"]Click here to receive Updates Via Email[/a]

Any Suggestion?

We would highly appreciate If you want to share any idea or suggest on any thing before we start the series guide. If you have any question in mind that is troubling you then feel free to start the warm tea discussion in the comments [a href="#comments" rel="nofollow"]below[/a]

Source: http://www.mybloggertricks.com/2011/07/create-design-custom-tabs-on-facebook.html
 
Play : Agame | Y8 Games | Y3 Games
Copyright © 2011. Blogger Tips And Tricks 2012 - All Rights Reserved

Proudly powered by Blogger