Paper Wall Blogger Template

Paper Wall is an amazing Blogger Template that has a very stylish but simple design..
The Template was designed by Indeziner for Smashing Magazine and converted to Blogger by Deluxe Templates..


This Template is Adsense Ready and comes with these features modded onto it..

1) Integrated Blended Adsense Ads..

2) Integrated Google Analytics..

3) Integrated Add this Bookmarking Widget

4)Modded Title Tags


  • Demo | Generate and download


  • Where to get the Analytics Tracking Id


  • 1. If you havent signed up for analytics you can signup at www.google.com/analytics/


    2. Now create your website profile.

    3. In google analytics home page all of your sites will be displayed..

    4. Near every site name you will find something like UA-123456

    5. This is the Tracking code for analytics..


    Credits

    Designer : Indeziner for Smashing Magazine

    Converter:Deluxe Templates
    Source: http://www.bloggerplugins.org/2009/07/paper-wall-blogger-template.html

    SEO Tips for Blogger - Part 1

    Search Engine Optimizatio or SEO - All of you might have heard of it??So what exactly is it?

    What do we do to make our Blog Friendly to our readers? - We do change the layout and design so that our blog looks elegant to eyes.

    What do we do to make our Blog friendly to Search Engines like Google,Yahoo and Bing? - Here is where we should do SEO..
    Unlike Wordpress and other blogging platforms,Blogger automatically does some SEO work for us making the job easier for us.Still there are some areas where we can do something

    Here is a collection of My SEO tips for my beloved readers..

    1) Don't put too much posts on homepage - When you put too much content on homepage, it leads to duplicate content. Means many pages on your blog will have similar content. Your latest post page and your homepage has got the same content rite?

    2) Submit a Sitemap to Google Webmaster Tools

    3) You will have links to feeds on your pages. Or may be some links to social bookmarking sites. Too many links on a page makes it unfriendly for search engines. So you should add the rel='nofollow' tag to such not so important links..

    - Feed links (The blog feed has same content as your blog.So it is important that you make the feed links nofollow)
    - Social Bokkmarking links - If you use social bookmark buttons like that for digg,stumble twitter etc, try making them nofollow..
    - Links to unimportant pages(unimportant to search engines.. ;) )like contact me page,link to me page,about me page etc..
    <a href="link url">link name</a> is a dofollow url
    <a href="link url" rel="nofollow">link name</a> is the nofollow version of the same link

    4) Use the Title Tag Hack

    5) Use Meta Tags
    - What you shouldn't do when using meta tags - I have seen many blogs using the same meta tag for all pages of the blog.You should never use such duplicate meta tags, I suggest that you use a separate meta description and keywords for your home page.You can use b:if conditions to do this.

    6) Get back links.. Get more links to your site from your friends.. ;)  You can also add a Link to your site Widget .

    7) Submit your blog to Directories. - One of them is here Blogger Directory

    8)I won't add a archive widget.If i do it i will display it on a particular page only. - Why? The archive widget has so many links in it..As i said too many links on a page is unfriendly to search engines.

    9)Don't add additional ROBOT meta tags.. Some guys try adding tags like <meta name='robots'...... >
    Blogger automatically does some SEO for it.. Don't override it. You know something? Every blogger blog has got a robots.txt file.. see mine.. http://www.bloggerplugins.org/robots.txt Off course we cant edit them.

    10)When building back links use your primary keyword as the anchor text. <a href="">Anchor Text</a> - > Just to explain what an Anchor Text is.
    I use Blogger Widgets as my Anchor Text.

    11) Use Alt tags for images. When you use images try to add alt tags. For example <img src="imageurl"/> can be replaced as <img src="imageurl" alt="Some alternate description for the image"/>

    12) Focus on what you write. Always try to write some unique and interesting content.You cant hope to be on top of search engines with copy paste blog posts..

    These are some of the ones that i remember..Will update it if i find anymore..
    Source: http://www.bloggerplugins.org/2009/07/seo-tips-for-blogger-part-1.html

    Recent Posts with Thumbnails for Blogger

    image This is an updated version of my Recent Posts Gadget.As the name suggests, this Gadget will help you to display the most Recent Posts on your Blog’s Sidebar. The Gadget has an options panel and can be configured to meet your needs. The Gadget inherits styles from your Blog. But you can override the colors if you want(this was done to support third party templates which doesn’t have the skin variables properly defined).

    Update : - For all those who complain that the Gadget doesn't  work ,please please check out this new Recent Posts Widget


    Gadget Settings


    image


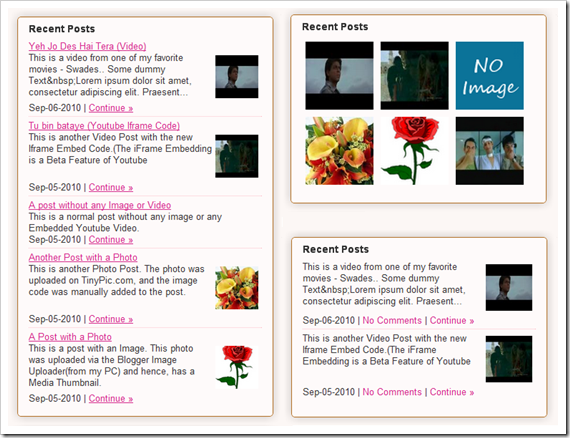
    Some Previews of the Gadget with  different configurations


    image About the Various Options


    Pull Posts From – By default, the recent posts will be fetched from the blog to which you have added the gadget. If you want to fetch the posts from another Blogger Blog, then you can change this option

    External Blogger URL – You need to fill out this field only if you are trying to pull posts from another blogger blog.

    Maximum Length of Post Title – Your post titles can be too long. In that case you can limit the title to x  number of characters using this parameter.

    Snippet Style – You can display the snippet with Post Summary, Post Thumbnail , or both or none.

    Snippet Thumbnail – When you upload photos from your PC to blogger using the Blogger Post Editor, Blogger generates a Media Thumbnail of size 72 X 72 px. If you add external images to your blog posts, then Media Thumbnails will be generated. If media thumbnails are not present, the post will be scanned for images or YouTube videos. You can specify which images to use by using this option. The No Image Thumb is a default image which will be used if post has no images or videos(you can turn this off) .

    Note:- If you want to grab the images or YouTube thumbnails, then you should have “Site Feeds” set to Full. If you opt for the Media Thumbnail only, then the short feed will be used by default.

    Thumbnail Dimensions – Size of the Thumbnail in pixels. The gadget doesn’t generate any Thumbnail. It just uses the media thumbnail,YouTube thumbnail , or any image in the post and scales it to the specified dimensions

    Summary Length  -  If you have opted to display the post Summary, then you can control the length of the summary(in characters)

    Post Meta Style – You can display the Post Date, Comment Count and a Read More Link.You can choose any combination of these three.

    Font  and Font Size– By Default, the container’s font  and Font Size is inherited into the Gadget. But if you are using a 3rd party template, then these might not be properly inherited. In that case you can use this Option to over ride these parameters.

    Extra Styling – Allows you to specify the position of the Thumbnail, and whether to underline the links or not.

    Border Color – If your specify a border color, and if the posts need separation, then a dotted border will be applied between the posts. If you don’t specify a color or if you specify an invalid color, then the border wont be drawn. You can use Hex Color Codes(eg: #000000) or  or normal colors (eg : red )

    Link Color and Text Color – By default, the link and text colors will be inherited from the blog. But if you want to override this, then you can specify the color in any of the two formats.

    Read More Text – This field was intentionally added to help blogs which are not written in English. Initially i used  “More »” as the Read more text without taking any user Input. Seeing this on a non- English Blog is a little awkward. So i added this new field :)


    Note : - Those who are using the older version of this gadget, please remove it and add the new one.


    Add The Gadget to your Blog


    Check out the Demo and Sample Configurations to see what  the Gadget can do. 


    Demos

    Your Suggestions and feedback are always welcome.

    Source: http://www.bloggerplugins.org/2009/07/recent-posts-widget-blogger-thumnail.html

    Jquery Image Magnifier For Blogger

    Jquery Effects Part 1


    This hack will help you to post elegant magnifying effects to the images you post in blogger.


    Here is a preview of what this script can actually do.


    The method. - This is actually a very simple hack.


    The Scripts for this amazing hack was developed by Dynamic Drive


    First of all you will have to download two files.


    One is the script that powers the magnification [http://dynamicdrive.com/dynamicindex4/jquery.magnifier.js]


    and second one the the cursor that should be displayed when you hover the mouse over the image.

    Upload the cursor file(2nd file) somewhere and note down its link.I would suggest you to use http://www.hotlinkfiles.com/


    Now Open up the first file(the js file) and find this line in that..


    cursorcss: 'url(magnify.cur), -moz-zoom-in',


    replace magnify.cur with the url of the cursor that you just uploaded now.

    Save this js file and upload it. note down the urls of this file.


    Now we have to add the script to our blogger template.


    To do that Goto Blogger Template- > Edit Html


    Find this code


    </head>


    and replace it with the following code[change url_of_jquery_script with the actual url]


    <script type="text/javascript" src="http://ajax.googleapis.com/ajax/libs/jquery/1.3.2/jquery.min.js"></script>
    <script type="text/javascript" src="url_of_jquery_script">
    /***********************************************
    * jQuery Image Magnify- (c) Dynamic Drive DHTML code library (www.dynamicdrive.com)
    * This notice MUST stay intact for legal use
    * Visit Dynamic Drive at http://www.dynamicdrive.com/ for this script and 100s more
    ***********************************************/
    </script>
    </head>


    Now when you add an image to blogger,use the class magnify..


    ie.. use something like


    <img src="https://blogger.googleusercontent.com/img/b/R29vZ2xl/AVvXsEju7hzL55IaCRVzeWJ_IXBnjWkazi5GC8XfhtQqjfoIjqrHVyG_qLbST9RW41Qp9oBb0_DqU1zWsXM6FTClcHa3hwXFZH1VR2Q-chtblbWF_fCdcdYbRO-tiWSardx2DqOSOoGYtr35j78/s400/aishwarya-rai-politician.jpg" class="magnify" magnifyby="5" style="width: 200px; height: 150px;" />


    ie when you upload an image,goto the Edit Html mode and replace the style and class tags of the image with the portion marked in red..and then


    The code that i used for this image is


    <img class="magnify" magnifyby="3" style="width: 200px; height: 250px;" src="https://blogger.googleusercontent.com/img/b/R29vZ2xl/AVvXsEju7hzL55IaCRVzeWJ_IXBnjWkazi5GC8XfhtQqjfoIjqrHVyG_qLbST9RW41Qp9oBb0_DqU1zWsXM6FTClcHa3hwXFZH1VR2Q-chtblbWF_fCdcdYbRO-tiWSardx2DqOSOoGYtr35j78/s400/aishwarya-rai-politician.jpg" alt="" id="BLOGGER_PHOTO_ID_5361650096596248578" border="0" />


    Changing s400 to s800 will get you a bigger image.. :)

    Source: http://www.bloggerplugins.org/2009/07/jquery-image-magnifier-for-blogger.html

    How to add Pages to Blogger like in Wordpress

    UPDATE - Blogger has now officially released its own version of the pages- More info

    Many of you might have wanted to use pages for Blogger like in Wordpress.But unfortunately Blogger doesn't provide any thing like Wordpress Pages.But there is still something that can be done.To know what i am talking about,just have a look at my About Page .


    To create a Wordpress like page in blogger,we will first create a normal post in blogger.If you don't want this post to be shown in your feed updates,change the date of the post to something very old[may be an year back.See the pic for details] . If you want to prevent users from posting comments on your pages,you can disable commenting on this particular post[see the pic for details]


    Now publish your post.We will use this as a pge.You might want to hide the social bookmarking icons and such other stuff from your ‘’pseudo pages’. Actually our blogger template is full of different divisions and we style each of these divisions using CSS.Using CSS rules,it is also possible to hide some of these divisions.So what must we be doing?We need to hide some unwanted divisions on our new pseudo page.


    Ok, to Do this find the </head> tag in your template.Just before this,we will add some additional CSS rules to hide those unwanted parts and divisions.We will use the b:if conditions to make the hiding affect our pseudo page only..[so that these rules don't hide these divisions on other pages]


    Just before the ,insert the following

    <b:if cond='data:blog.canonicalUrl == "http://www.bloggerplugins.org/2005/06/about-me.html"'>

    <style>

    .comments-block,.comment-form,.comment-footer,.blog-pager,.feed-links,.comments,.bookmark{display:none;}

    </style>

    </b:if>


    Here i have given some list if divisions which should be hidden.If you need to hide any other divisions you can add this to the list but make sure to separate the different divisions using commas.


    Source: http://www.bloggerplugins.org/2009/07/how-to-add-pages-to-blogger-like-in.html

    Some Tricks for making links in Blogger Posts

    Creating links in blogger is very easy. There is a link Option in our WYSIWYG Editor.When you use this option you can easily add a new link. Now to see the Code of this link just clisk on the Edit Html Option on your Editor[See image for details]

    There you will see something like


    Additional Options


    1.Open The link in New Window

    To open the link in a new window,add the target="_blank" option to your link so that the code becomes something like


    2.Adding a Relation attribute


    Relation attribute can be specified by adding the rel="relation"

    The relation attribute is used to specify the relation of the link to the our post. One commonly used relation is external which specifies that the link is a link to an external page


    The external relation is not much useful to us.But there is yet another one,

    rel="nofollow" - When we add this to a link,we specify the search engines that they shouldn't go exploring this link url from our post page.This thing is important.Having too many links[especially to external pages] is not good for Search Engine Optimization. So if you link to some external website use the rel="nofollow" option


    [Note:Don't use the rel="nofollow" option when you are giving credit to the original author of an article that you use in your blog.They deserve to be followed by the search Engines :)]


    3.Adding the Title Attribute

    If you add a title attribute to a link,then if someone hovers his mouse over that link,the title will be displatyed as a description of the link.


    As an example try doing a hover over the next link[W3Schools] it will display Title of the link to W3 Schools.This is beacuse i have given this text as the tilte attribute of that link


    To know more about the different attributes available for links visit W3Schools . Its the best place for a beginner.


    4.Remove Underlining of a link

    In some blogger templates,the links within the posts may be underlined. To remove the underlining you can use the style attribute - text-decoration:none


    5.List of Links


    If you want to use a list of links ,then you should use the<ul> <ol> and <li tags

    <ul> stands for unordered list and <ol> stands for ordered list.:( What does this mean??

    Ordered list means the list of links will be numbered. Here is the demo


    Ordered List Demo

    1. URL NAME 1

    2. URL NAME 2

    3. URL NAME 3


    Ordered List Code

    <ol>

    <li><a href="URL_1">URL NAME 1</a></li>

    <li><a href="URL_2">URL NAME 2</a></li>

    <li><a href="URL_3">URL NAME 3</a></li>

    </ol>


    To change this to an unordered list,i.e without numbering, just change <ol> to <ul> and </ol> to </ul>


    You can also use the ordered and unordered lists for arranging normal text[other than links]


    Source: http://www.bloggerplugins.org/2009/07/some-tricks-in-making-links-in-blogger.html

    Using Windows Live Writer for Blogger


    Blogger Supports XML-RPC Protocol which enables 3rd part Clients to make posts on Blogger.One of the Best Blogging Clients is Windows Live Writer.It comes for free.They just need you to have a windows live id(Sign up for one if you don’t have any)

    Download Windows Live Writer


    What is Windows Live Writer?

    Its a Software which lets you to make posts to your blog from your desktop.This Software has a very simple and easy to use post editor with live preview and a bunch of very useful features

    Features

    1.Easy Upload of Images with Effects Watermarks and Borders


    livewriter Live Writer Allows you to easily add pictures.In addition to that you can also add watermarks,effects, and special borders to your pictures.See this pic.I have added some watermarking and black and white effect to this photo.I have also added some special border effects

    2.Easy Upload of Videos.

    Live Writer allows you to easily upload your videos.You can post your video files to youtube and soapbox from this software and publish it on your blog.In addition you can also embed existing youtube videos onto your blog posts

    3.Offline Editing is possible Windows live writer helps you to make posts offline and publish it when you want to. You will also get a live preview feature.

    4.Availability of Plugins

      There are lots of plugins available for Windows Live Writer.Some of them which i use are

    a)Table Plugin – This plugin helps us to easily insert tables to our blog posts.See this demo table. :)

    Image Upload borders,Watermarking and other effects
    Video Upload Upload videos to youtube or use existing youtube videos
    Availability of plugins choose plugins that match your needs

    b) Code Plugin – This Plugin allows you to insert code into your blog posts.If you are a programmer who posts code snippets in posts,then this will surely be useful.As a demo check out the code presentation at my label cloud post

    There are many more plugins available. You can check them out yourself – List Of Plugins

    5.Make multiple Posts at the Same Time. – You can run multiple copies of windows live writer at the same time


    6. More Options for Hyper links. – There are more options for making link.You can opt to open link in new window,add title to the link and add nofollow tags and lots more.


    If you are a noob to Windows Live Writer(like me) just take a look at some of these tips - Windows Live Writer Tips

    Did i miss out any nice features or plugins?? Or did i miss out any annoyances?? If i did please let me know so that i can update this post.

    A very special thanks to Prasannajeet who brought me back to Windows Live Writer.I haven’t been using this for long.


    Source: http://www.bloggerplugins.org/2009/07/using-windows-live-writer-for-blogger.html
     
    Play : Agame | Y8 Games | Y3 Games
    Copyright © 2011. Blogger Tips And Tricks 2012 - All Rights Reserved

    Proudly powered by Blogger