What do you think of this new make over?
Give me your feedback guys :)
If you are not sure what a custom domain is, then first read this article about Blogger Custom Domains and come back .
Name.Com will allow you to buy domains with different extensions like .COM, .NET, .ORG etc .
1. First of all Goto Name.Com and you will find a Search Box there. This search box can be used to check if the domain name is available or not. For example if i need the domain mynewcustomdomain.com , then i will search for mynewcustomdomain
2.Name will show the available domain name extensions.Select the one you want.
3.Click the Checkout Button and on the next screen opt to create an account(if you don’t have one. if you have one , then login with that account)
4.Now finish the payment process(using credit card or paypal) and you will be having the domain under your name.com account
1.If you are logged in at your name.com account, then click the Account Icon V

2. Now you will be taken to a page listing all your domains. Click on the domain name which you want to use for your blogger blog.
3. On the next screen Click DNS Management form the Right Sidebar
4.In the DNS Management, add a new CNAME record with the following values CNAME, www, ghs.google.com,1800 and submit
5.Now again add another DNS record with the following values A, (leave next field blank),216.239.32.21 and 1800 and click submit
Create 3 More A records with following set of values
6. Now we are done setting up the CNAMES and A Records
Adding the Custom domain at Blogger.com
1.Login to your Blogger Dashboard and Navigate to Settings > Publishing.
2.Opt For Switch to: Custom Domain (Point your own registered domain name to your blog) and switch to advanced settings
3.Type your new domain there ,fill in the Captcha and save the settings.
4.Now select the redirection Option and save the settings Once again
5. Now your blog should be visible at your new domain. The changes can take up to 3 days to take effect (This is because your ISP’s DNS Server has to get the new updated information about the domain records.)
1.Login to you Name.Com account once again
2.Click the Account Icon and then Click the domain name that we just used.
3.Now Click on the Enable link next to Google APPS
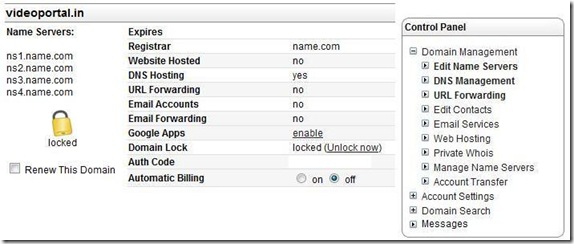
4. On the next Screen fill out the required details and click Continue with setup
5.Now you will be able to access your version of Gmail at http://mail.yourcustomdomain.com and similarly you will have the other Google apps running on your sub domains.
Try it out guys. and let me know if this tutorial helped you in any way :)
Also Check out : Create a Subdomain on your custom domain blog
Permalink: Setting up Blogger Custom Domain on Name.Com
Facebook is a great Social Networking Site to promote your blog or brand. Most of the major brands do have a Facebook Fan Page. Here are some examples of Facebook Fan pages – Coca Cola FB Fan Page , Mashable FB Fan Page. Are you impressed and want to create one for your blog? I too wanted to create one and i finally made it. Here is the link of my Facebook Fan Page . So lets start making our own Facebook Fan Page for our blog.
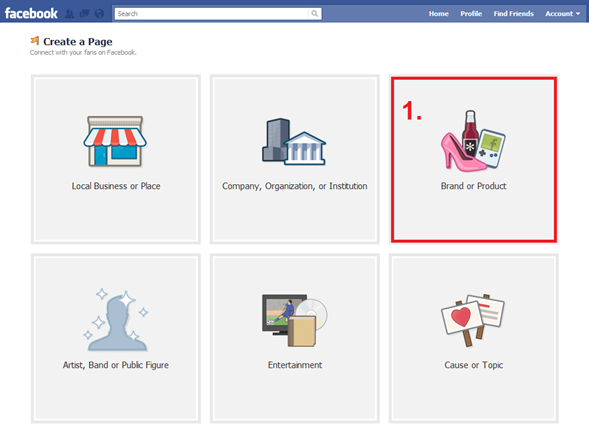
1.Go to the Create Fan Page Link on Facebook and select Brand or Product
Choose Website from the drop down list and provide the Page name in the next box. Read and agree to the terms and click the “Get Started” button.
2.On the Next Page, Upload an Image for your Fan Page
3.Once you have added the image, you can edit the fan page information by clicking on the “Edit Page” link as in the image below
Edit the fan page information and Save the Changes.
4. Now your Fan Page has been properly set up.If you want, you can automatically post your blog posts to Facebook. There are multiple ways to do it. I'm specifying one of them here
Using the RSS Graffiti Application
a. Go to http://apps.facebook.com/rssgraffiti/ and authorize RSS Graffiti
b. Once authorized, you will see a list of your Fan Pages on the left.Click on the Fan Page Name
Now authorize RSS Graffiti(second authorization for your fan page) to access your Fan Page
Once authorized, Click on the Add Feed Button, and enter your Feed Url.
If your blog is http://blogname.blogspot.com, then your Feed Url will be http://blogname.blogspot.com/rss.xml
here I have used http://www.bloggerplugins.org/rss.xml as my feed url.. Click the link which says “click here to fetch and preview” and see if its grabbing your blog feed.(If its not grabbing your feed, then check if you have enabled the Blog Feeds. If your blog is not on blogger, then your feed url will be different.).
Now Go to the Filter Tab and click on the Change link next to the Cut-off date/time . Choose the last post(oldest one) from the drop down. and click the Save button.
It may take some time for your posts to appear on your Fan Page Wall(your latest 25 posts). From now on every new post that you make will be automatically posted to your Fan Page’s Wall.There might be some delay in the wall getting updated, as RSS Graffiti checks the feed for new entries at regular time intervals.(If you want to post to your profile Wall as well, then in RSS Graffiti, click on your name and add the feed there as well)
Your Fan Page URL will look something like http://www.facebook.com/pages/Blogger-Widgets/252379165362 .Now if you have a pretty good number of fans(i think the minimum requirement is 25 fans) , then you can have a pretty Facebook URL like http://www.facebook.com/bloggerplugins instead of a long one like http://www.facebook.com/pages/Blogger-Widgets/252379165362 .
To claim such small usernames for your Facebook page, go to http://www.facebook.com/username/ and Click on Set a username for your Pages. There you can select the small pretty user name for your fan page.Once you opt for a user name you can’t change it back again. So be careful when choosing your Facebook Fan Page Username.
So you just created a new Fan Page with no fans. To get more fans, you can try adding a Like Box to your blog. This will allow Facebook users to “Like” your Fan Page directly from your blog. To add a Fan Box refer the following tutorial
1. Facebook Like/Fan Box For Blogger
You can get more Fans, by telling your Friends about your Fan Page. In the Get Started Tab of your Fan Page, you will see an option to invite your Friends
Hope you get more Fans on your Fan Page. Happy Facebooking..
If you think that this tutorial helped you out in making a better Fan Page, then consider being my Fan by clicking on this Like Box Below.
Also Check out :
Facebook Like / Recommend Buttons For Blogger - New
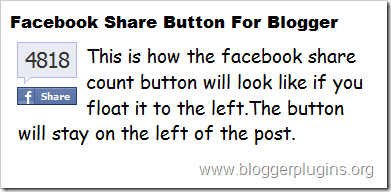
Facebook has now officially introduced the Retweet like Facebook buttons for your blogs or sites. These Facebook buttons look much similar to the Retweet buttons by Tweetmeme. Facebook has 5 styles of Sharing buttons. Here we will see two of them.
Adding a Facebook share count button will show a neat count of how many times your blog post has been shared on Facebook.
Note: The Facebook share buttons are deprecated and FB no longer supports it(It still works though). You can still add it if you want. You can also opt to add the new Facebook Like Buttons with Like Count.
<div style="float:right;padding:4px;">
<b:if cond='data:post.isFirstPost'>
<script>(function(d){
var js, id = 'facebook-jssdk'; if (d.getElementById(id)) {return;}
js = d.createElement('script'); js.id = id; js.async = true;
js.src = "//connect.facebook.net/en_US/all.js#xfbml=1";
d.getElementsByTagName('head')[0].appendChild(js);
}(document));</script>
</b:if>
<fb:share-button expr:href='data:post.url' type='box_count'/>
</div>
<div style="float:left;padding:4px;">
<b:if cond='data:post.isFirstPost'>
<script>(function(d){
var js, id = 'facebook-jssdk'; if (d.getElementById(id)) {return;}
js = d.createElement('script'); js.id = id; js.async = true;
js.src = "//connect.facebook.net/en_US/all.js#xfbml=1";
d.getElementsByTagName('head')[0].appendChild(js);
}(document));</script>
</b:if>
<fb:share-button expr:href='data:post.url' type='box_count'/>
</div>
<div style="float:right;padding:4px;">
<b:if cond='data:post.isFirstPost'>
<script>(function(d){
var js, id = 'facebook-jssdk'; if (d.getElementById(id)) {return;}
js = d.createElement('script'); js.id = id; js.async = true;
js.src = "//connect.facebook.net/en_US/all.js#xfbml=1";
d.getElementsByTagName('head')[0].appendChild(js);
}(document));</script>
</b:if>
<fb:share-button expr:href='data:post.url' type='button_count'/>
</div>
<div style="float:left;padding:4px;">
<b:if cond='data:post.isFirstPost'>
<script>(function(d){
var js, id = 'facebook-jssdk'; if (d.getElementById(id)) {return;}
js = d.createElement('script'); js.id = id; js.async = true;
js.src = "//connect.facebook.net/en_US/all.js#xfbml=1";
d.getElementsByTagName('head')[0].appendChild(js);
}(document));</script>
</b:if>
<fb:share expr:href='data:post.url' type='button_count'/>
</div>
1.Select one of the Share Button Styles and copy the Corresponding Code.
2.Now login to your Blogger Dashboard and navigate to Layout > Edit Html and check the check box which says “Expand widget templates”
3.Find this piece of code
and immediately after that place our Facebook share button code(that you copied) If you were unable to find this code in your template,then look for the first occurrence of
<data:post.body/>
and immediately before that paste our Facebook Share button code(that you copied).
4.Next you have to add the fb namespace to your template tag.Your template should have the specification for the fb tag that you have used. The following namespace declaration will take care of that. To declare the namespace, find
<html
and change it to
<html xmlns:fb="https://www.facebook.com/2008/fbml"
The following screenshot will help you out.
This is necessary for all FBML widgets using the fb tag. So if you have already added the namespace while adding some other FB plugin, then you can skip this.
5. Save the template and you should get a Facebook share count button near each of your blog post
If you liked this post and if it helped you in implementing the Facebook buttons, then please consider sharing this post on Facebook using the button on the top-right of the post :)
Also Check out :
Permalink :Facebook Share Count Buttons for Blogger
Before getting into the details of selective display,let us discuss about the different types of pages on blogger.
1) home page- yea its your blogs home page as the name suggests(actually this is not a type. but i will still include it here..)
2) Archive Page- Refers to archive pages..
3) Item Page - Refers to Post Pages
4) Index Page - Includes home page + label page + search results page
5) Static Page – The newly introduced Blogger Pages
Selective Display..
There are different conditions to check the page type. You can use these conditions for the selective display.
You might like to display a welcome message on the home page only..
Displaying something on static pages only
You can use the conditional thing for the index type pages. But i don't find much use in that.
Now displaying something on a particular url only (may be a particular post page only or something like that)