Enclosure Links in Blogger

"Enclosures" are the bits of info in Atom and RSS feeds that make podcasting possible. With the new enclosure links UI, you can turn your blog into a podcast quite easily.

To turn on enclosure links, just go to Settings > Formatting and set the “Show Link fields” option to “Yes.”  and save the settings

image

image

This will add the enclosure link fields to your post editor. From there, just paste in the URLs of your recorded media, and your blog will instantly become a podcast.

This is how your post editor look like, after adding the enclosure links

image


Source: http://www.bloggerplugins.org/2010/05/enclosure-links-in-blogger.html

Better Post Preview in Blogger

image

Blogger has now added a better Post Preview  and a Preview Button on the Blogger Post Editor . The new Preview button opens up a new window showing a templated preview(the old preview function just showed a miniature preview without the actual templating) of the post that you are currently editing. This will let you see a complete preview of your post page even before hitting the Publish button.

In order to see the Preview Button, you should  Edit / Create your post from your

Blogger Dashboard and hit the Preview button on your post Editor.

image

This is a screenshot of the preview page, which came up when i was editing this post. [Click the image below for a larger image.]


The Preview Window won’t automatically update as you edit your posts(as the content of your post changes). You have to Hit the Preview button once again(or refresh the preview page)  to see the  changes in the preview
Source: http://www.bloggerplugins.org/2010/05/better-post-preview-in-blogger-in-draft.html

How to Add Custom Fonts to Blogger

image

Adding Custom Fonts to Blogger can improve the look and feel of your blog. Before getting into font embedding lets know how this works.

In your templates you can use any font you want, but these would be properly displayed only if the viewer has those fonts installed on his/her System.

Font embedding Techniques allows you to use any font on your Blog and these fonts will be viewable to the viewers even if they don’t have the font installed on their Systems.

@font-face is the  best Font Embedding technique in my opinion but it wont  easily work with  externally uploaded fonts unless the server has special Access Control Headers for your blog .(blogger wont allow you to upload the font to it’s servers :P ) So here are certain simple alternative  methods to add custom fonts to your blog. These are listed out in an order of my preference

  1. Google Font API
  2. Kernest Font API
  3. Cufon JavaScript Font Embedding

1. Google Fonts API.

This is the best and robust method to add custom fonts to your blogger blog. It uses the @font-face technique but you needn’t worry about the backend things. You can see a list of available Fonts at the Google Font Directory .

When you select a particular Font, Google will provide you with the Embed Code which looks like

image

<link href='http://fonts.googleapis.com/css?family=FontName' rel='stylesheet' type='text/css'>


Copy out this code and you have to modify it by changing > at the end of the code to />


That is you have to change the code to something like


<link href='http://fonts.googleapis.com/css?family=FontName' rel='stylesheet' type='text/css'/>


Adding the Google CSS Embed Code


Now Go to your Blogger >  Design  > Edit HTML page


Find <head> and immediately below that line paste the edited Embed Code and save your template.


image


Using This Custom Font on your Template


You use this Custom Font in any of your CSS Font Definitions. For example if you want to change the Post Title Font to this one, then you can use the following CSS code


h3.post-title {font-family: 'CustomFontName', serif;}


In This definition serif is a fallback font which will be used in case the something bad happened when loading the custom font. (It is a safe practice to include at least one Fallback font and it  will help in tackling unexpected behaviours) After editing the above CSS with the proper Custom Font name,add the code above the closing ]]></b:skin> tag in your template.


image


You can alter other fonts in your Template by modifying the font-family definitions in your template.


How to use Multiple Custom Fonts in your Blogger Template


When you use multiple Custom Fonts, then there is no need to add the Google CSS embed codes multiple times.You can load multiple fonts using a single line of code.


For example if you are planning to use  3 custom Fonts Tangerine,Inconsolata, Droid Sans, then you can load all these three fonts using a single embed code


<link rel="stylesheet" type="text/css" href="http://fonts.googleapis.com/css?family=Tangerine|Inconsolata|Droid+Sans"/>


ie, just separate the multiple fonts by a |


Now to apply these fonts on your template, you can use these in your template CSS


For example you may use something like


h3.post-title {font-family: 'Tangerine', serif;}
#header h1 {font-family: 'Inconsolata', serif;}
.sidebar h2 {font-family: 'Droid Sans', serif;}


Extra Settings


By Default the Google API provides the Regular version of the Font. If you need specialised versions like  bold, italic or bold and italic, then you have to append :b  , :i or :bi to the font name in the  google font embed code.


For example, if you need the blold + italic version of the Tangerine font, then you should have used the following embed code


<link href='http://fonts.googleapis.com/css?family=Tangerine:bi' rel='stylesheet' type='text/css'/>


If you like to play around with codes , then refer the Google Font API Documentation


You might also want to refer the Google JavaScript Web Font Loader, which provides you with more Fonts and Font Providers.


These Web Fonts would be much useful for Non-English Blogs, if the other language Fonts get added to the  Font Directory


2. Kernest Font API


1.Create an Account and signup at Kernest


2.Browse through the Fonts at Kernest.


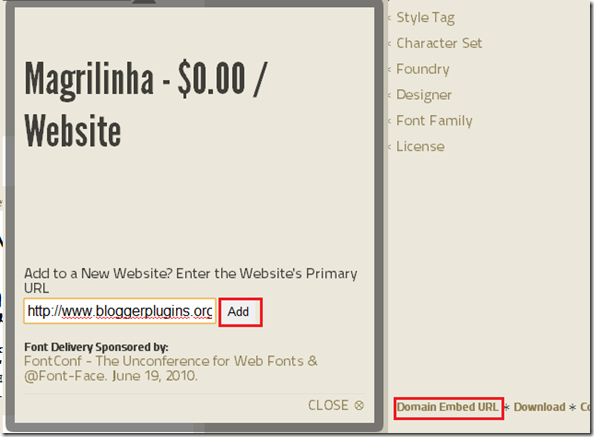
3. Add your  domain url by clicking on the Domain Embed Url


image


4.If the Font is free you will find the embed code below the font demo.


image


Copy the Style Sheet code from there(as shown in the image above)


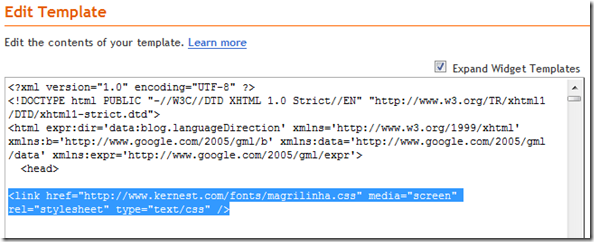
5.Login to your blogger Template and Go to Design > Edit HTML and paste this code just below the <head> tag in your blogger template and save it.


image


6. Now you can use this Custom Font name inside your CSS style Definitions.


For example , if you need to change the font style of the post title, add the following code


.post-title h3 {font-family: 'NAME_OF_THE_FONT_U_ADDED' , serif;}


just  above the closing ]]></b:skin> tag after editing the code with the custom font name that you added.(serif is the fallback font which will be used if some misbehaviours prevented your custom font from loading)


image


You can use this Custom Font name in any font style definitions in your template


3. Cufon Font Embedding


1.You should have the font with you in TTF , OTF or PFB formats.


2.Now Goto the Cufon Generator Page and browse for your Font in the Regular Type Face section


Make  sure that “The EULAs of these fonts allow Web Embedding” .


Accept the terms and click the “Lets do it” Button


3. You will be prompted to download a JavaScript file. Save it to your computer.


4.Right Click on this link and Click on the Save Link as option and save this JavaScript File to your PC.


5.Upload these 2 JavaScript files somewhere and note down their urls.


6. Now Goto Blogger Design > Edit HTML and just below the <head> in your template , add the following code after editing the code with the proper urls of the two script files


<script src="url_of_cufon-yui.js" type="text/javascript"></script> 
<script src="url_of_the_font.js" type="text/javascript"></script>


<script type="text/javascript">
Cufon.replace('.post h3');
</script>


7. Now just before the closing body tag </body> , add the following code(IE fix)


<script type="text/javascript"> Cufon.now(); </script>


I would advice you to use the Google Font Embedding API , but the Fonts available on them are now limited. Kernest also has a good Collection of Fonts. If you use Cufon make sure that you have the rights to use the font. Cufon will allow you to use virtually any font but its not as robust as the other two methods.


If you have any doubts regarding Font Embedding, please let me know via the comments and i will try to help you out.


Source: http://www.bloggerplugins.org/2010/05/how-to-add-custom-fonts-to-blogger.html

Official Sharing Buttons on Blogger

image

Blogger has been rolling out new features to improve the looks and usability of the blogs. Blogger is now testing out a new Social Sharing icon set consisting of Email, Blogger,Twitter(with goo.gl shortener),Facebook and Google buzz buttons. The set looks simple and elegant with some cool mouse over effects. These Sharing buttons are now available in your regular dashboard.If you need to take a peek at these new sharing icons, then take a look at my post page(and try sharing it :P ).

You are still reading. So i guess that you are really interested in implementing these Sharing buttons on your Blogger Blog.

Then don’t wait. Just follow these simple steps

  1. Login to Your Blogger Dashboard
  2. Go to Design > Page Elements and Click on the Edit Button near the Blog Posts Gadget and check the “Show Share Buttons” Option image
  3. You can Drag and Drop the Share buttons and place it where you want.image
  4. Now if everything went right, then you should be able to see the Share buttons on your Blog. If not then read on. :)
  5. If it didn’t appear then don’t worry, That is because you are having a modded template. Just Go to the Edit HTML page under the Design Tab , Check the “Expand Widget Templates” Option and locate
    <p class='post-footer-line post-footer-line-3'>

    Or if that is not there then find

    <div class='post-footer-line post-footer-line-3'>

    Or if that is not there then find

    <data:post.body/>

    and place the following code just below any of these lines[whichever is present in your template].

    <div class='post-share-buttons'>
    <b:include data='post' name='shareButtons'/>
    </div>
    and Save your template.

Google + 1 Button Doesn’t show up


1. If it doesn’t show up, then replace the share button code first.To do that, look for

<b:includable id='shareButtons' var='post'>

in your template. Now delete everything including this line, till the very next occurrence of

</b:includable>
(including this line)

Now we can add a new b:includable block there. So paste the following code there instead of the old b:includable block

<b:includable id='shareButtons' var='post'>
<b:if cond='data:top.showEmailButton'><a class='goog-inline-block share-button sb-email' expr:href='data:post.sharePostUrl + &quot;&amp;target=email&quot;' expr:title='data:top.emailThisMsg' target='_blank'>
<span class='share-button-link-text'><data:top.emailThisMsg/></span>
</a></b:if><b:if cond='data:top.showBlogThisButton'><a class='goog-inline-block share-button sb-blog' expr:href='data:post.sharePostUrl + &quot;&amp;target=blog&quot;' expr:onclick='&quot;window.open(this.href, &quot;_blank&quot;, &quot;height=270,width=475&quot;); return false;&quot;' expr:title='data:top.blogThisMsg' target='_blank'>
<span class='share-button-link-text'><data:top.blogThisMsg/></span>
</a></b:if><b:if cond='data:top.showTwitterButton'><a class='goog-inline-block share-button sb-twitter' expr:href='data:post.sharePostUrl + &quot;&amp;target=twitter&quot;' expr:title='data:top.shareToTwitterMsg' target='_blank'>
<span class='share-button-link-text'><data:top.shareToTwitterMsg/></span>
</a></b:if><b:if cond='data:top.showFacebookButton'><a class='goog-inline-block share-button sb-facebook' expr:href='data:post.sharePostUrl + &quot;&amp;target=facebook&quot;' expr:onclick='&quot;window.open(this.href, &quot;_blank&quot;, &quot;height=430,width=640&quot;); return false;&quot;' expr:title='data:top.shareToFacebookMsg' target='_blank'>
<span class='share-button-link-text'><data:top.shareToFacebookMsg/></span>
</a></b:if><b:if cond='data:top.showOrkutButton'><a class='goog-inline-block share-button sb-orkut' expr:href='data:post.sharePostUrl + &quot;&amp;target=orkut&quot;' expr:title='data:top.shareToOrkutMsg' target='_blank'>
<span class='share-button-link-text'><data:top.shareToOrkutMsg/></span>
</a></b:if><b:if cond='data:top.showBuzzButton'><a class='goog-inline-block share-button sb-buzz' expr:href='data:post.sharePostUrl + &quot;&amp;target=buzz&quot;' expr:onclick='&quot;window.open(this.href, &quot;_blank&quot;, &quot;height=415,width=690&quot;); return false;&quot;' expr:title='data:top.shareToBuzzMsg' target='_blank'>
<span class='share-button-link-text'><data:top.shareToBuzzMsg/></span>
</a></b:if>
<b:if cond='data:top.showDummy'>
<div class='goog-inline-block dummy-container'><data:post.dummyTag/></div>
</b:if>
</b:includable>

2.Save the template, and see if the Plus One button is showing up.If it is then you are done. Otherwise proceed to step 3.


3. Locate

</head>

and just above that paste the following code

<script src='https://apis.google.com/js/plusone.js'/>

and Save the template.Now you should see the +1 buttons on your blog.


Optional Tweaks


  1. Show the Sharing Buttons on Post pages only - Find the Following Code in your template
    <div class='post-share-buttons'>
    <b:include data='post' name='shareButtons'/>
    </div>
    and wrap it within conditional tags as
    <b:if cond='data:blog.pageType == &quot;item&quot;'>
    <div class='post-share-buttons'>
    <b:include data='post' name='shareButtons'/>
    </div>
    </b:if>

  2. Hide Some of the Sharing Buttons – If you want you can hide some of these buttons using CSS. For example to hide the Blogger sharing button, add the following code above ]]></b:skin> in your template
    .sb-blog{display:none}

    sb-email , sb-twitter, sb-facebook, sb-buzz and sb-blog are the different Button Classes. If you hide the mail or buzz buttons, then it might look a little bad as these have rounded edges,


  3. How to add the text “Share this:” before the Share Buttons? – This was one of the questions asked in the comments.So here is how to do it.Go to Design > Edit HTML and “Expand Widget Templates”.Look for

    <b:includable id='shareButtons' var='post'>
    Just below that add
    <table border='0'><tr><td><b>Share this : </b></td><td>
    Now Look for the first occurrence of
    </b:includable>
    that comes after that. Just above that add
    </td></tr></table>

Got into Trouble with implementing the sharing buttons? Ok leave a comment here and i will try to help you out. :)


Source: http://www.bloggerplugins.org/2010/06/official-sharing-buttons-on-blogger.html

Blogger Stats on your Blogger Dashboard

Blogger Stats Many of you might have been using Google analytics or some third party tracking scripts for monitoring your blog statistics. Now blogger has made it much easier for you. You can now get the stats right in your dashboard without adding any extra widgets or codes to your template. This feature is not yet available on your regular dashboard. This is only available on the Blogger in Draft Dashboard.

“The coolest thing about the new Blogger Stats is that it monitors and analyzes your visitor traffic in near-real-time. You can see which posts are getting the most visits and which sites are sending traffic to your blog right now. For example, if a reader shares one of your blog posts on Twitter and the post is getting lots of clicks, you will see a traffic increase in Blogger Stats almost instantly, with the particular Tweet mentioning your post being identified as the traffic source. Of course, traffic data across longer time periods (day/week/month) and all-time historical data are available as well.”

Source : (Official blogger in Draft Blog)

The stats will keep track of the popular keywords,countries where the visitors come from,web browsers used by the visitors and lots more.

“Note that the page view data in Blogger Stats and in Google Analytics may not be identical, due to different collection mechanisms used. Also, Blogger Stats do not support private blogs for now.”

Source : (Official blogger in Draft Blog)

How to See My Blog Stats?

  1. Blogger Stats is Currently available on the Blogger in Draft Dashboard only. So login at http://draft.blogger.com
  2. Now Click on the Stats Link Next to your Blog
    image

Here are the Screen shots of the different Tabs of Blogger Stats For the “Last Day” with the figures shaded out :)

blogger-stats-1

blogger-stats-2

blogger-stats-3

blogger-stats-4


Source: http://www.bloggerplugins.org/2010/07/blogger-stats-on-your-blogger-dashboard.html

Set your photo as background image of Blog


It has been almost 5 months since blogger released the Template Design Tool. Blogger is working on adding more and more features to this innovative Design Tool. The design Tool allows you to change the Blog Background in a few Clicks.Blogger has got a huge collection of images from iStockPhotos which you can use on your blog. Blogger has now gone a step further by allowing users to Upload their on photos and use it as the Blog Background. This feature is not available on your Regular Dashboard..


How to use your Photo for the Blog Background?


Requirement


  1. You should be using a Template Designed using the Blogger Template Designer


The Background may not look good on all of the Templates in the Template Designer

Steps

1.Login to your Blogger in Draft Dashboard at http://draft.blogger .com

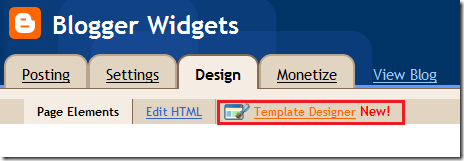
2. Go to the Design Link  and Click on the Template Designer

image

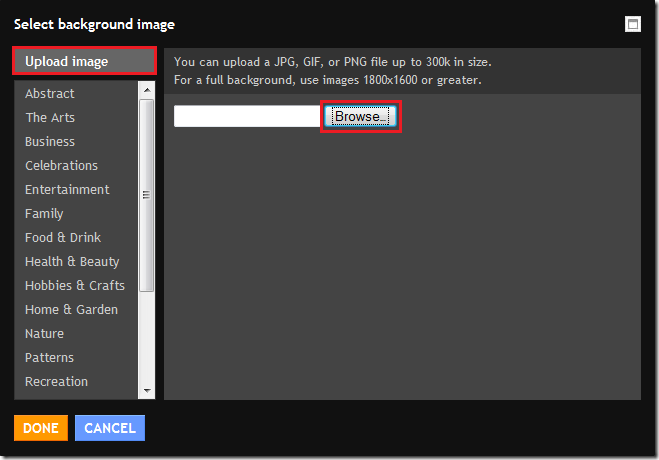
3. Click on Background Image under the Background Tab

image

3. In the Overlay Window you can upload your own Image

image

4. Once the upload completes, click on the uploaded image and you will be able to see a live previewimage

5. Click Done and Apply these Changes to the blog.

image
Source: http://www.bloggerplugins.org/2010/08/set-photo-as-background-image-of-blog.html

Display Short URLs for Blogger Posts with Bit.ly

short-urls-for-blogger-posts-with-bitly

Having a Shorter Version of your Blog Post’s URL is much useful especially when sharing links with others. For example Take a look at this Link http://bit.ly/aJMJNI . If you visit that link, you will end up right back here. This URL shortening was done with the Help of the Bit.ly API. Bit.ly is one of the most reliable URL shortening services on the Web. Wordpress has got its own URL shortener namely WP.me. If you are interested in providing Short Sharable URLs of your Blogger Posts to your readers, then read on. Demo is present on the post page.

Template Tweaking to Add the  Short URLs

  1. Login to your Blogger Dashboard and navigate to Design > Edit HTML
  2. Click on the Check Box which says “Expand Widget Templates.
  3. Locate
    </head>

    and add the following JavaScript Snippet just above that

    <script charset='utf-8' src='http://bit.ly/javascript-api.js?version=latest&amp;login=tweettrackjs&amp;apiKey=R_7e9987b2fd13d7e4e881f9cbb168f523' type='text/javascript'/>
    <script src='http://blogger-plugins.googlecode.com/files/bloggerplugins.org.bit.ly.short.url.generator.js' type='text/javascript'/>


  4. Now Locate


    <p class='post-footer-line post-footer-line-3'>


    Or if that is not there then find


    <div class='post-footer-line post-footer-line-3'>


    Or if that is not there then find


    <data:post.body/>


    and place the  following code  just below any of these lines[whichever is present in your template].


    <div id='bp_shorturl'>
    <form expr:id='"bp_short_holder_" + data:post.id'/></div>
    <script type='text/javascript'>
    Bloggerplugins_shortener.init(&quot;bp_short_holder_<data:post.id/>&quot;,&quot;<data:post.canonicalUrl/>&quot;)
    </script>


Save the changes and now you should See a Sharable Short URL below each of your posts .If you want to tweak further, then read on.


Optional Tweaks


1.Styling the Share Link


Locate the following line in your template


]]></b:skin> 


and just above that line add


#bp_shorturl {
color:#666;
font-size:11px
}
#bp_shorturl input {
color:#999;
border:inset 1px #CDCDCD;
padding:1px 5px;
}


and save.


2. Display the Short Link on Post Pages Only


If you want to restrict the Short URLs to your post pages, then wrap the codes mentioned in Steps 1 and 4 within Conditional tags like :


<b:if cond='data:blog.pageType == &quot;item&quot;'>
<script charset='utf-8' src='http://bit.ly/javascript-api.js?version=latest&amp;login=tweettrackjs&amp;apiKey=R_7e9987b2fd13d7e4e881f9cbb168f523' type='text/javascript'/>
<script src='http://blogger-plugins.googlecode.com/files/bloggerplugins.org.bit.ly.short.url.generator.js' type='text/javascript'/>
</b:if>

and

<b:if cond='data:blog.pageType == &quot;item&quot;'>
<div id='bp_shorturl'>
<form expr:id='"bp_short_holder_" + data:post.id'/></div>
<script type='text/javascript'>
Bloggerplugins_shortener.init(&quot;bp_short_holder_<data:post.id/>&quot;,&quot;<data:post.canonicalUrl/>&quot;)
</script>
</b:if>


3. If you have your own Bit.Ly Login and API key, then you can replace them in the code of Step 1(tweettrackjs and R_7e9987b2fd13d7e4e881f9cbb168f523). Its free to signup and it is advised to use your own login and API because too many API calls on the same login can create an undefined error


Demo: (wont appear if you are reading this in a a feed reader or else where)


Share this:


Source: http://www.bloggerplugins.org/2010/08/short-urls-for-blogger-posts-with-bitly.html
 
Play : Agame | Y8 Games | Y3 Games
Copyright © 2011. Blogger Tips And Tricks 2012 - All Rights Reserved

Proudly powered by Blogger