Facebook Like Box For Blogger

Facebook Like Button allows you to provide more Sharing Options to your Readers. Your readers can share your posts on Facebook using the Like Button. Have you added the Like button and still not getting any “Likes”? :(. Ok then we will present the Like button in a much better and elegant way.

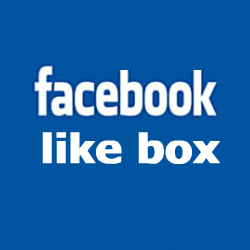
Here is a Screenshot of the Facebook Like Box. Isn’t it lovely and more “Likable” than the default Like Button?

image

The  Facebook Like box also includes a link to  your Facebook Fan Page. This FB Like Box was Designed Styled and coded by Mia of Dezign Matterz .  Thanks to her for designing and styling  this awesome Like Box.

How to install the Facebook Like Box?

1. First Fill in the following Details (Code will be updated with these details)

Width of the Like Box                     (Enter the appropriate width of the FB like box)
Facebook Fan Page / Profile URL

2. Now Login to your Blogger Account and navigate to Design > Edit HTML and check the option which says “Expand Widget Templates”

3. Look for  ]]></b:skin> in your template and just above that place the following code (You can use Ctrl +F to find the code).

.fb_like_box {
margin-top:10px;
-moz-border-radius:10px 10px 10px 10px;
border-radius:10px;
background-color:#3B5999;
border:3px solid #2B2B2B;
margin-bottom:10px;
padding:10px 7px;
width:540px;
}
.fb_like_top {
overflow:visible;
padding:0;margin:0 0 5px;
width:349px;
height:24px;
background:url("http://lh5.ggpht.com/_u4gySN2ZgqE/TJ3dpjy9PaI/AAAAAAAABr0/PTUXIS8ykps/fblogo%5B3%5D.jpg") no-repeat scroll left top transparent;
}
.fb_like_button_holder {
-moz-border-radius:10px 10px 10px 10px;
border-radius:10px;
background:none repeat scroll 0 0 #FFFFFF;
padding:12px 12px 0 12px;
width:515px;
height:42px;
}
4. Now Look for <data:post.body/> in your template and just below that add the following code.
<b:if cond='data:blog.pageType == &quot;item&quot;'>
<div class='fb_like_box'>
<div class='fb_like_top'></div>
<div class='fb_like_button_holder'>
<b:if cond='data:post.isFirstPost'>
<script>(function(d){
var js, id = 'facebook-jssdk'; if (d.getElementById(id)) {return;}
js = d.createElement('script'); js.id = id; js.async = true;
js.src = "//connect.facebook.net/en_US/all.js#xfbml=1";
d.getElementsByTagName('head')[0].appendChild(js);
}(document));</script>
</b:if>
<fb:like expr:href="data:post.canonicalUrl" layout='standard' send='true' show_faces='false' width="450" font="arial" action="like" colorscheme="light"></fb:like>
</div>
</div>
</b:if>

5.Next you have to add the fb namespace to your template tag.Your template should have the specification for the fb tag that you have used. The following namespace declaration will take care of that. To declare the namespace, find

<html

and change it to

<html xmlns:fb="https://www.facebook.com/2008/fbml"

The following screenshot will help you out.


image This is necessary for all FBML widgets using the fb tag.  So if you have already added the namespace while adding some other FB plugin, then you can skip this.


6. Now Save your template and you will see a Facebook Like Box on your post pages.


Source: http://www.bloggerplugins.org/2010/09/facebook-like-box-for-blogger.html

Better YouTube Support in Blogger

Better YouTube Support in BloggerBlogger allows you to upload your own videos via the Blogger Post Editor. It also allows you to embed YouTube videos into your posts(by copy pasting the YouTube embed code into your post editor). Now Blogger has made this process even more simpler by providing a better interface for adding YouTube videos.

This YouTube integration is available only in the updated Post Editor. So if you are still using the old editor, it’s a good time for an upgrade.

This feature is currently available in the draft version of blogger. So, to test this new feature,you should login to your Draft Dashboard(http://draft.blogger.com) instead of the regular one(http://www.blogger.com)

image

Search for some video using some keywords, select the video and click the select button

image

Now you should see the video in your post Editor. You can continue editing the post using the WYSIWYG Editor and publish it. If you are trying to embed your own YouTube videos(The ones uploaded to YouTube by you), then you can use the “My YouTube videos” Tab.

image

Sharing a  video from YouTube.

YouTube has  got a Blogger Share Button which will enable you to quickly post the video onto your blog.This might be very useful when you suddenly stumble upon some interesting video and want to post it onto your blog.

image

If you have multiple blogs, select the appropriate one from the Popup Post Editor and you can quickly publish the video to your blog.

image


Source: http://www.bloggerplugins.org/2010/12/better-youtube-support-in-blogger.html

Better Feed Control on Blogger

Better Feed Control on BloggerTill now Blogger used to have two Feed Control Options, a Short Feed or a Full Feed. The short feed, as the name suggests contains a short version of your post with HTML and images stripped off. The Full Feed contains everything including the images and the HTML. Now Blogger has added a third option which will give you better control over what gets displayed in your Feed.

The New “Until Jump Break” option is like the Full Feed but it will strip  off everything after the jump break and it will also include a Read More Hyperlink with the “Post page link text:” which you have given in the Blog Post gadget’s Settings. If you are unaware of Jump breaks and Read more, checkout this link

Blogger Jump Breaks and Read More

To change the Feed Settings, follow these steps.

1. Login to you Blogger Dashboard and go to Settings > Site Feed

2. Change the Allow Blog Feeds Option and Click Save Settingsimage


Source: http://www.bloggerplugins.org/2010/12/better-feed-control-on-blogger.html

Decorate your Blog for Christmas

christmas-bells-icon-bigIt's Christmas time and here is a Blogger Widget to decorate your blog For Christmas. You can see the demo here in this my blog. The Christmas Bells and the Snow Fall are a part of this Widget.


value="<b:includable id='main'><data:content /></b:includable>" />


After Adding the Gadget, drag it to someplace in your Footer(This will improve the page load speed).

image

image

Click the  SAVE button image

If you want to remove the Widget, you can click on the Edit Link on the Gadget and click on the Remove button

image

I will try to add some more Christmas Gadgets to this post if I get time. :) If you have any suggestions, please drop them in.


Credits : jQuery SnowFall Plugin

Bell Icon Courtesy : http://mohsenfakharian.deviantart.com/


Source: http://www.bloggerplugins.org/2010/12/decorate-your-blog-for-christmas.html

Mobile Templates for Blogger

Mobile Templates for BloggerBlogger has now released mobile templates, which would make your blog look cool on your smartphones.  The mobile templates will reformat your blog for mobile phones. It will even strip down the post content on your home page, so that its more readable and not too lengthy. 

This feature is still in draft and so you will have to login to http://draft.blogger.com to enable this new Feature.

To Enable this Feature,

1. Login to http://draft.blogger.com

2. Go to Settings > Email & Mobile and Select the  Yes Option.

image

3. Now if you want to see  a preview of how your blog will look on a mobile,(without actually applying the settings), then click the Mobile Preview Button.

4. Now Click on the Save Settings Button for the changes to take effect.

image

Now when someone visits your blog via a phone, he will be automatically redirected to the mobile version of your blog.

Here are some previews of the mobile versions of some blogger blogs.

1. My Blog

2. Blogger Buzz

If you have enabled Adsense ads on your blog, then Adsense mobile ads will be shown on the mobile version of your blog. If you are using a template from some designer, then the mobile template won’t be rendered in the same style as your original template. The ones using the Blogger Template Designer will be able to get a matching mobile template. 

This is still under draft. So lets hope that we will be able to add CSS rules  to override the default Mobile Style, when this thing actually rolls out.


Update: This Feature has now moved out of draft. So you will be able to set this from your regular dashboard.


Source: http://www.bloggerplugins.org/2010/12/mobile-templates-for-blogger.html

How to post large images in Blogger(Multiple Image Sizes in Blogger)

how-to-post-large-images-in-bloggerAs you might already know, Blogger is integrated with Picasa and  all the images that you upload to Blogger automatically becomes a part of your Picasa account.Picasa has got 1 GB free Storage.So if your Picasa Account exceeds this 1 GB limit, you wont be able to post more images to your blog.(In that case you will have to buy additional Storage).

Each of your Blogs will be having a separate album in your Picasa Account. You can check it out at http://picasaweb.google.com  The visibility of these albums will be set to “Anyone With Link” and hence these albums won’t be publically visible to anyone.If you delete any of these images from Picasa, they will disappear from your blog as well. 

Images uploaded to Picasa have some special properties which might come in handy for you. You can resize or crop these images so easily. This post talks specifically about landscape images.

Resizing Images in Blogger / Picasa

The maximum width of a Picasa image is 1600px. If you upload images which have a bigger width, then picas a will automatically scale them to a width of 1600px maintaining the aspect ratio. Once you have uploaded an image to Picasa/blogger, you can have multiple sizes of the image by altering the image URL.

Example : https://blogger.googleusercontent.com/img/b/R29vZ2xl/AVvXsEjXm_cg3rd2NOHEZeyhO2ks_l952A6t5lPhR5k7ip9gWRky_7KaEs2jkkv7hRZSeGVpamP8o6ZXd4os9iyBbuqtuUq9cwofnpbg7r75B7zLs3HIE6lXjrDhtz6tbafKIv8wXkUN3smjbbI/ is an 1920x1020px image that I uploaded to Picasa via Blogger. It automatically got resized to  1600x900px

https://blogger.googleusercontent.com/img/b/R29vZ2xl/AVvXsEjXm_cg3rd2NOHEZeyhO2ks_l952A6t5lPhR5k7ip9gWRky_7KaEs2jkkv7hRZSeGVpamP8o6ZXd4os9iyBbuqtuUq9cwofnpbg7r75B7zLs3HIE6lXjrDhtz6tbafKIv8wXkUN3smjbbI/s1600/1920.1080.jpg

This is the image URL that I got in my blogger post Editor. You can get multiple sizes of the image by varying this bolded parameter. An image URL with s1600 will have a maximum width of 1600px. Similarly an image URL https://blogger.googleusercontent.com/img/b/R29vZ2xl/AVvXsEjXm_cg3rd2NOHEZeyhO2ks_l952A6t5lPhR5k7ip9gWRky_7KaEs2jkkv7hRZSeGVpamP8o6ZXd4os9iyBbuqtuUq9cwofnpbg7r75B7zLs3HIE6lXjrDhtz6tbafKIv8wXkUN3smjbbI/s777/1920.1080.jpg will have  a maximum width of 777px. (Here as the actual image is larger than 777px, it will show a scaled pic with width 777px)

Here is another image that I uploaded

https://blogger.googleusercontent.com/img/b/R29vZ2xl/AVvXsEhzswD9Zp0f_-u12nsfotPc580-SPIrnd2bK4-9AoPwrR8aA3xk5ocgEi5YmZbpCuLTOJeeYkN1MvWtOkQcQNYCPOpOHVSI1lqqCFddLTglLHJw-Nx4fLkzyfDCTAPdcrFiN1-62B9ZJN4/  (actual size 126x131px)

Now lets try modifying the image URL

https://blogger.googleusercontent.com/img/b/R29vZ2xl/AVvXsEhzswD9Zp0f_-u12nsfotPc580-SPIrnd2bK4-9AoPwrR8aA3xk5ocgEi5YmZbpCuLTOJeeYkN1MvWtOkQcQNYCPOpOHVSI1lqqCFddLTglLHJw-Nx4fLkzyfDCTAPdcrFiN1-62B9ZJN4/s777/christmas-bells-icon.png

Here the actual size of the image is less than 777 px and hence the original image will be shown without any scaling

Cropping images in Blogger / Picasa

Picasa can also provide you with Cropped images. You have to add a -c to the modifiable parameter to crop the image.
http://1.bp.blogspot.com/_u4gySN2ZgqE/TRoVyjWy22I/AAAAAAAABxA/s1600-c/zqjhDdXbITk/1920.1080.jpg
will provide you a cropped 1600x1600 px image
https://blogger.googleusercontent.com/img/b/R29vZ2xl/AVvXsEhzswD9Zp0f_-u12nsfotPc580-SPIrnd2bK4-9AoPwrR8aA3xk5ocgEi5YmZbpCuLTOJeeYkN1MvWtOkQcQNYCPOpOHVSI1lqqCFddLTglLHJw-Nx4fLkzyfDCTAPdcrFiN1-62B9ZJN4/s1600-c/christmas-bells-icon.png
will provide you with a cropped(Plus scaled) 1600x1600 px square image.
http://1.bp.blogspot.com/_u4gySN2ZgqE/TRoVyjWy22I/AAAAAAAABxA/s111-c/zqjhDdXbITk/1920.1080.jpg
will provide a  111x111px cropped version of the image
Remember 1600 is the maximum pixel size that you can use when modifying the image urls for cropping or resizing purposes.


-h parameter.
When adding images using the old Blogger Post Editor, you might have come across urls containing /s1600-h/ . These links will actually generate an HTML page where the image is embedded.
https://blogger.googleusercontent.com/img/b/R29vZ2xl/AVvXsEjXm_cg3rd2NOHEZeyhO2ks_l952A6t5lPhR5k7ip9gWRky_7KaEs2jkkv7hRZSeGVpamP8o6ZXd4os9iyBbuqtuUq9cwofnpbg7r75B7zLs3HIE6lXjrDhtz6tbafKIv8wXkUN3smjbbI/s200-h/1920.1080.jpg
is a link to an HTML page where the image is embedded(maximum width of the image is 200px)

Posting Big Images in Blogger

If you read everything posted above, then you should be able to manipulate the image links so that you get an image of an appropriate size. Refer These Screenshots  for posting large images onto Blogger. Click the image for a larger view.

New Post Editor

large-images-on-blogger

Old Post Editor

large-images-on-blogger-old-post-editor

If you feel that you need to post a big image, but your post area is too small to accommodate it, then you can try using the Light Box Overlay Viewer for Blogger


Source: http://www.bloggerplugins.org/2010/12/how-to-post-large-images-in-blogger.html

More Fonts on Blogger Template Designer

Some months back, I had posted about how you can add Custom Fonts to Blogger using the Google Fonts API. Now Blogger has integrated all of these Custom Fonts into the Blogger Template Designer. This means that you will be able to use these Custom Fonts without the need for any Template Edits.

This should work for all the Templates Designed using the Template Designer. This should also work for those third party templates where the Font variables are properly defined and used. This feature is not yet available in your regular Dashboard. So if you would like to try out these fonts, then you will have to login to Blogger’s Draft Dashboard.

Here are the instructions on how you can change the Fonts using the Template Designer

1. Login to http://draft.blogger.com and navigate to the Design > Template Designer

image

In the Advanced Tab, you will be able to change the font’s of different texts on your blog. Select the type of text you want to change and you a list of  of fonts on the right side(including some new stylish fonts added form the Google Font repository) there. You can easily pick the Font of your choice and preview it in the designer. Once you are satisfied, you can Apply the changes to your blog using the Apply to Blog Button

This was released onto the draft dashboard some months back. Sorry for the delayed update.


Source: http://www.bloggerplugins.org/2011/01/more-fonts-on-blogger-template-designer.html

Facebook Like/Fan Box For Blogger

facebook-fan-box

This tutorial is for everyone who has already created a Facebook Fan Page. If have not created one, try making one. A Fan Box or Like Box allows your Blog visitors to like your Facebook fan page, without leaving your blog. It can also display faces of the “likers” on your blog. To add the fan box to blogger, follow these steps:

1. Find out your Facebook Fan Page URL. To do that, just visit your Facebook Fan Page, and copy the url in the address bar.

image

In my case it is http://www.facebook.com/bloggerplugins (The url which you see in the address bar when you visit your fan page.) .Copy this url from your address bar.

2. Visit This page http://developers.facebook.com/docs/reference/plugins/like-box

You have already copied the Facebook fan page url. Paste this into the Facebook Page URL field

image

Select the choices appropriately and you can see a live preview of the Like/Fan box.

3.Once you are satisfied with the looks of the Like Box, Click on the “Get Code” button

4. Copy the xfbml code which gets generated.

image

5. Now login to your Blogger account and go to Design > Page Elements

Click Add a Gadget Link and Add an HTML/JavaScript Gadget

image

6.Paste the generated code as the Gadget’s Content

image

and Save the Gadget.

7.Next you have to add the fb namespace to your template tag.Your template should have the specification for the fb tag that you have used. The following namespace declaration will take care of that. To declare the namespace, Go to Design/Template > Edit HTML and find

<html

and change it to

<html xmlns:fb="https://www.facebook.com/2008/fbml"

The following screenshot will help you out.


image This is necessary for all FBML widgets using the fb tag.  So if you have already added the namespace while adding some other FB plugin, then you can skip this.


8.Save the Template and you should see the Fan/Like Box on your blog’s sidebar.


Another variation


If you need a simpler Like button, without any extra decorations, then visit http://developers.facebook.com/docs/reference/plugins/like . In the code generator, paste your Facebook Fan Page’s url as the URL to Like and follow steps 3 to 5. Now you will get a simpler Like Button with count.


Source: http://www.bloggerplugins.org/2011/01/facebook-like-fan-box-for-blogger.html

Official Android App for Blogger

androidGood news for all android Folks!!. Blogger has released an official Android App. Its simple and neat and does the job perfectly.  You can create a post or make drafts from your android device.If you are an android user, try it out by downloading the App from the Android market

Features

  1. Switch between Google Accounts as in any other Google Android App
  2. Publish posts or save drafts
  3. Upload photos from your android gallery, or take one on the fly with the mobile camera and post it
  4. Share your location and geotag your post. 
  5. Share your Gallery images easily to Blogger. ( A blogger option will be added to your Share Menu)
  6. View and Edit saved Drafts/ Published Posts made from the mobile app(not the ones that already exist)

You can find more details about all these features at the Blogger Buzz Post.

The app does a neat job though it doesn’t give you much power in formatting your posts properly. This is the first ever version of the official Android App, so maybe we could expect many more features in the future.

A Sample Mobile post from my phone : androiddemobloggerplugins.blogspot.com

You can provide feedbacks about this application to the blogger team and help them in developing better versions


Source: http://www.bloggerplugins.org/2011/02/official-android-app-for-blogger.html

What’s next with Blogger

What's next with BloggerBlogger was created by Pyra Labs in 1999 and was acquired by Google in 2003. Ever since the acquisition, Google has been improvising and adding new features it. Blogger is changing and its changing real fast. Last year we saw lots of new features being added on to blogger like:

1. The Template Designer – This one is really really cool, and I must say that this is best got from blogger in 2010

2. Web Fonts – Blogger has integrated Google’s Web Fonts into the Blogger Template Designer, which gives the user the option to use these stunning fonts on our blogs without the need to add any CSS or JavaScript Snippets

3. Mobile Templates – This was another breakthrough, where blogger introduced a mobile version with post snippets and smaller thumbnails.

5. Auto Pagination – Many might have felt that this one is really causing a lot of trouble as they won’t really be able to control how many post would be displayed on a page. But this has really improved the page load times of most blogs.

There were many more like the Real Time Statistics, Comment Spam Filtering , Popular Posts gadget, YouTube integration, Better Post Previews and others.

What’s coming to Blogger?

Blogger has released a few screenshots about some of the new features that would be added to Blogger this year.

1. An improved Dashboard using GWT with a better and cleaner display.

2. Updated Post Editor

3. Some additions to the Blogger Nav Bar(Related Posts and Media)

Checkout  this video released by the Blogger Team.Its really worth a watch :)


You can read more at the Official Blogger buzz Post: http://buzz.blogger.com/2011/03/whats-new-with-blogger.html


Source: http://www.bloggerplugins.org/2011/03/whats-next-with-blogger.html

Follow By Email Gadget for Blogger

imageSome of you might have already noticed the new “Follow by Email” Gadget on your “Add a Gadget Page”. The gadget is pretty simple and easy to install.


To add this Gadget, Follow these simple steps

1. Login to your Blogger Dashboard, Navigate to Design > Page Elements tab and click on the “Add a Gadget” Link

2.On the next window click on the plus sign, and you will be taken to the gadget options page.image

3. Click the save Button and you are done.

image

You are done now!! :) Wasn’t that simple?

Some  Insight!!

You can track your subscription information from your FeedBurner Panel.

Though this gadget has got a simple easy to use interface, the gadget is really intelligent, and does  lot of background work and synchronization. It checks if you have already burnt your blogger feed, and if you have, then it retrieves  your Feed burner URL automatically. If you have burnt  the feed but  hadn’t enabled the Email Subscription option for your Feed, then it automatically enables the same.

If you haven’t even used FeedBurner before, then it automatically burns your blogger feed, and retrieves the new FeedBurner url of the new feed that was generated.

Oh!! I hate the url that FeedBurner gave me.

If your blog has a very common name, then there is every possibility that you will end up with a  non-pretty FeedBurner url like http://feeds.feedburner.com/blogspot/qOAyP . Most of  you might not give a damn about this url. But if you really want to change it, then you can easily do that as well.Follow these Steps

1. Login to http://feedburner.com and Click on the Feed For your Blog

image

2. Click on Edit Feed Details

image

3. Change the Feed Address to something pretty!

4. Click on Save Feed Details button

image

What do you think of this new Gadget from the Blogger Team and what tweaks would you like to see on this gadget?


Source: http://www.bloggerplugins.org/2011/03/follow-by-email-gadget-for-blogger.html

Blogger Pages are finally out

Blogger has now released the pages feature just like in Wordpress blogs. You can use these pages for about me, contact me etc. The blogger pages are more or less like the blogger posts. But these pages wont appear in the blog archives and the blog feeds.

How to create a Blogger Page?

1. Login to your Blogger Account

2. In the posting Tab you will find an Edit Pages optionimage

3.Click on the New Page button and you will get a new page editor(same as the post editor that you normally use)image

4.You can make the page, in the same way as you create a post.If you want to enable commenting on the page, then you can do so from the post options

image

5. When you hit the Save And Publish Page button, you will be asked if you would like to add the Page Gadgets onto your blog

image

You can add the page gadget on the sidebar or as Top navigation Tabs.These widgets may not properly sync with your blog template.So i would advise you to choose the No Gadget option and add the links manually to your blogger template. You can obtain the links to the newly created pages from the Edit Pages Tab.

If you opt to add any of Pages gadget, then you will get an easy interface to add the page links to your blog. (now available on draft.blogger.com only) Here is what the Gadget options will look like

image


Limitations

1. You can only create a maximum of 10 pages.

2. Separate templating for pages would be a little too difficult(but not impossible :) )

3. The Static Pages are not included in the Post Exports till now.(at the time when this post is made)

Advanced options.

If you are familiar with the usage of blogger’s conditional tags and want to do something special with the pages, then you can use the following conditional tag for that

<b:if cond='data:blog.pageType == &quot;static_page&quot;'>
When condition is true this will be done
</b:if >

eg: If you want to hide the sidebar on the Static Pages, then you can use these conditional tags properly to implement that

Here is the incomplete sample code for the same

<b:if cond='data:blog.pageType == &quot;static_page&quot;'>
<style type="text/css">
.sidebar-wrapper{display:none;}
</style>
</b:if >

This code should be placed above </head> in your template.

you will have to add some more CSS definitions to make it complete(you should increase the width of the post area.. ) these will be different from template to template. So  you will have to figure it out :)

So are some of my Blogger Pages. – Subscribe , Contact Me

Misbehaviour

1. If you are using the automatic post summaries hack, then your pages might not be properly displayed. I have updated the Automatic Post Summaries Trick so that it does not conflict with the static pages. So if you are using an older version of this trick, then do update

2. If you are using some trick to hide the post contents on non-post pages,then also you might end up with  problems on your new Static Blogger Page. You can either undo the trick or update the codes properly to avoid conflicts :)


Source: http://www.bloggerplugins.org/2010/01/blogger-pages-are-finally-out.html

Blogger FTP to Custom Domain Migration

Blogger FTP to Custom Domain Migration

Blogger has officially announced that it would be shutting down the FTP publishing feature on March 26 2010. So the existing FTP publishers are advised to move onto Blogger Custom Domains.If you are not currently using the FTP publishing option, you can just skip this tutorial :)

Blogger has already posted about the advantages of custom domains.

Where do you currently publish your FTP blogger blog ?

1.If you are publishing at a root level domain or sub-domain, then the things are pretty easy. (eg. www.yourblog.com or blog.yourdomain.com).

2.If you are publishing your blog at some subfolder within your domain or subdomain(www.yourdomain.com/blog), then you can no longer host your blog at that address, because Custom Domains can be setup at root domain or sub-domains only.Blogger will soon release a migration tool which will help you in properly redirecting such blogs.

Can i get rid of my web-host?

If you are hosting your blog at a root level domain or sub-domain and not inside a directory and if you are have not published any images via FTP(images are hosted on other sites like flickr), then you no longer need a web-host.

Migrating www.yourblog.com (FTP) to www.yourblog.com  (Custom Domain)

Note:- The following steps can also be used to migrate a sub-domain from FTP to Custom domain(ie blog.yourdomain.com from FTP to Custom Domain).  This method cant be used for migration of a blog located at www.yourdomain.com/blog or subdomain.yourdomain.com/blog

1. When you move your blog to a custom domain, you will have to  move all the images to a different sub-domain on your server

2.Create a new sub-domain like files.yourblog.com and move all your images to this sub-domain (For example www.yourblog.com/uploaded_images/image1.jpg should now be accessible at files.yourblog.com/uploaded_images/image2.jpg)

3.If you are using a shared hosting service, ask your host to create a Canonical Name(CNAME) record for www with value ghs.google.com

(DNS changes are cached  at many levels and your ISPs may take time to get in sync with the 13  root level domain name servers. So the changes may take time :)

4.Once your host is done with it, Log in at your Blogger Dashboard and navigate to Settings > Publishing

5.Opt For Switch to:  Custom Domain (Point your own registered domain name to your blog)    and switch to advanced settings

6.Type your new domain/subdomain there image and in the missing file host option type in files

image

type the captcha and save the settings. If everything goes right, your blog has now been successfully moved to the custom domain.

What does the Missing files host do?

When blogger is not able to find a file like www.bloggerplugins.org/uploaded_images/image1.jpg , it will try to find it at files.bloggerplugins.org/uploaded_images/image1.jpg [Click on the link to see it in action]

If you are hosting your blogger blog on a sub-directory, then wait for the Blogger FTP migration tool(it will be out in a couple of weeks). Once you are done with the migration tool, just follow the steps 4-6.You wouldn't need to use a missing files host in that case.


If you have any questions about the migration, leave your questions in the comments section.


Source: http://www.bloggerplugins.org/2010/01/blogger-ftp-to-custom-domain-migration.html
 
Play : Agame | Y8 Games | Y3 Games
Copyright © 2011. Blogger Tips And Tricks 2012 - All Rights Reserved

Proudly powered by Blogger